Most "automation" tutorials stop at "when X happens, send a Slack message." Real business processes are messier: something arrives, an AI reads it, a decision splits the path, data gets written somewhere, a human signs off, and only then does the email go out.
FlowFn workflows are built for exactly that. A workflow is a visual graph of nodes — a trigger that starts the run, and a chain of tasks that each do one job and pass their results to the next. There are eleven task types plus triggers, and by the end of this guide you'll have seen every single one in context.
We'll build one realistic workflow end to end: Lead Qualification & Routing. A lead lands via webhook, an AI model scores it, a condition splits hot from cold, hot leads get written to a CRM sheet + a Slack alert + a manager's approval before a discount email goes out, and cold leads drop into a nurture email. Then we'll tour the remaining nodes (Code, Loop, Parallel, Data Visualizer) that power heavier flows.
Every screenshot below is the real FlowFn builder.
Where workflows live
Workflows are one of the artifacts your App owns. From the dashboard, open Workflows to see everything you've built, each card showing its status and the mix of node types inside it.
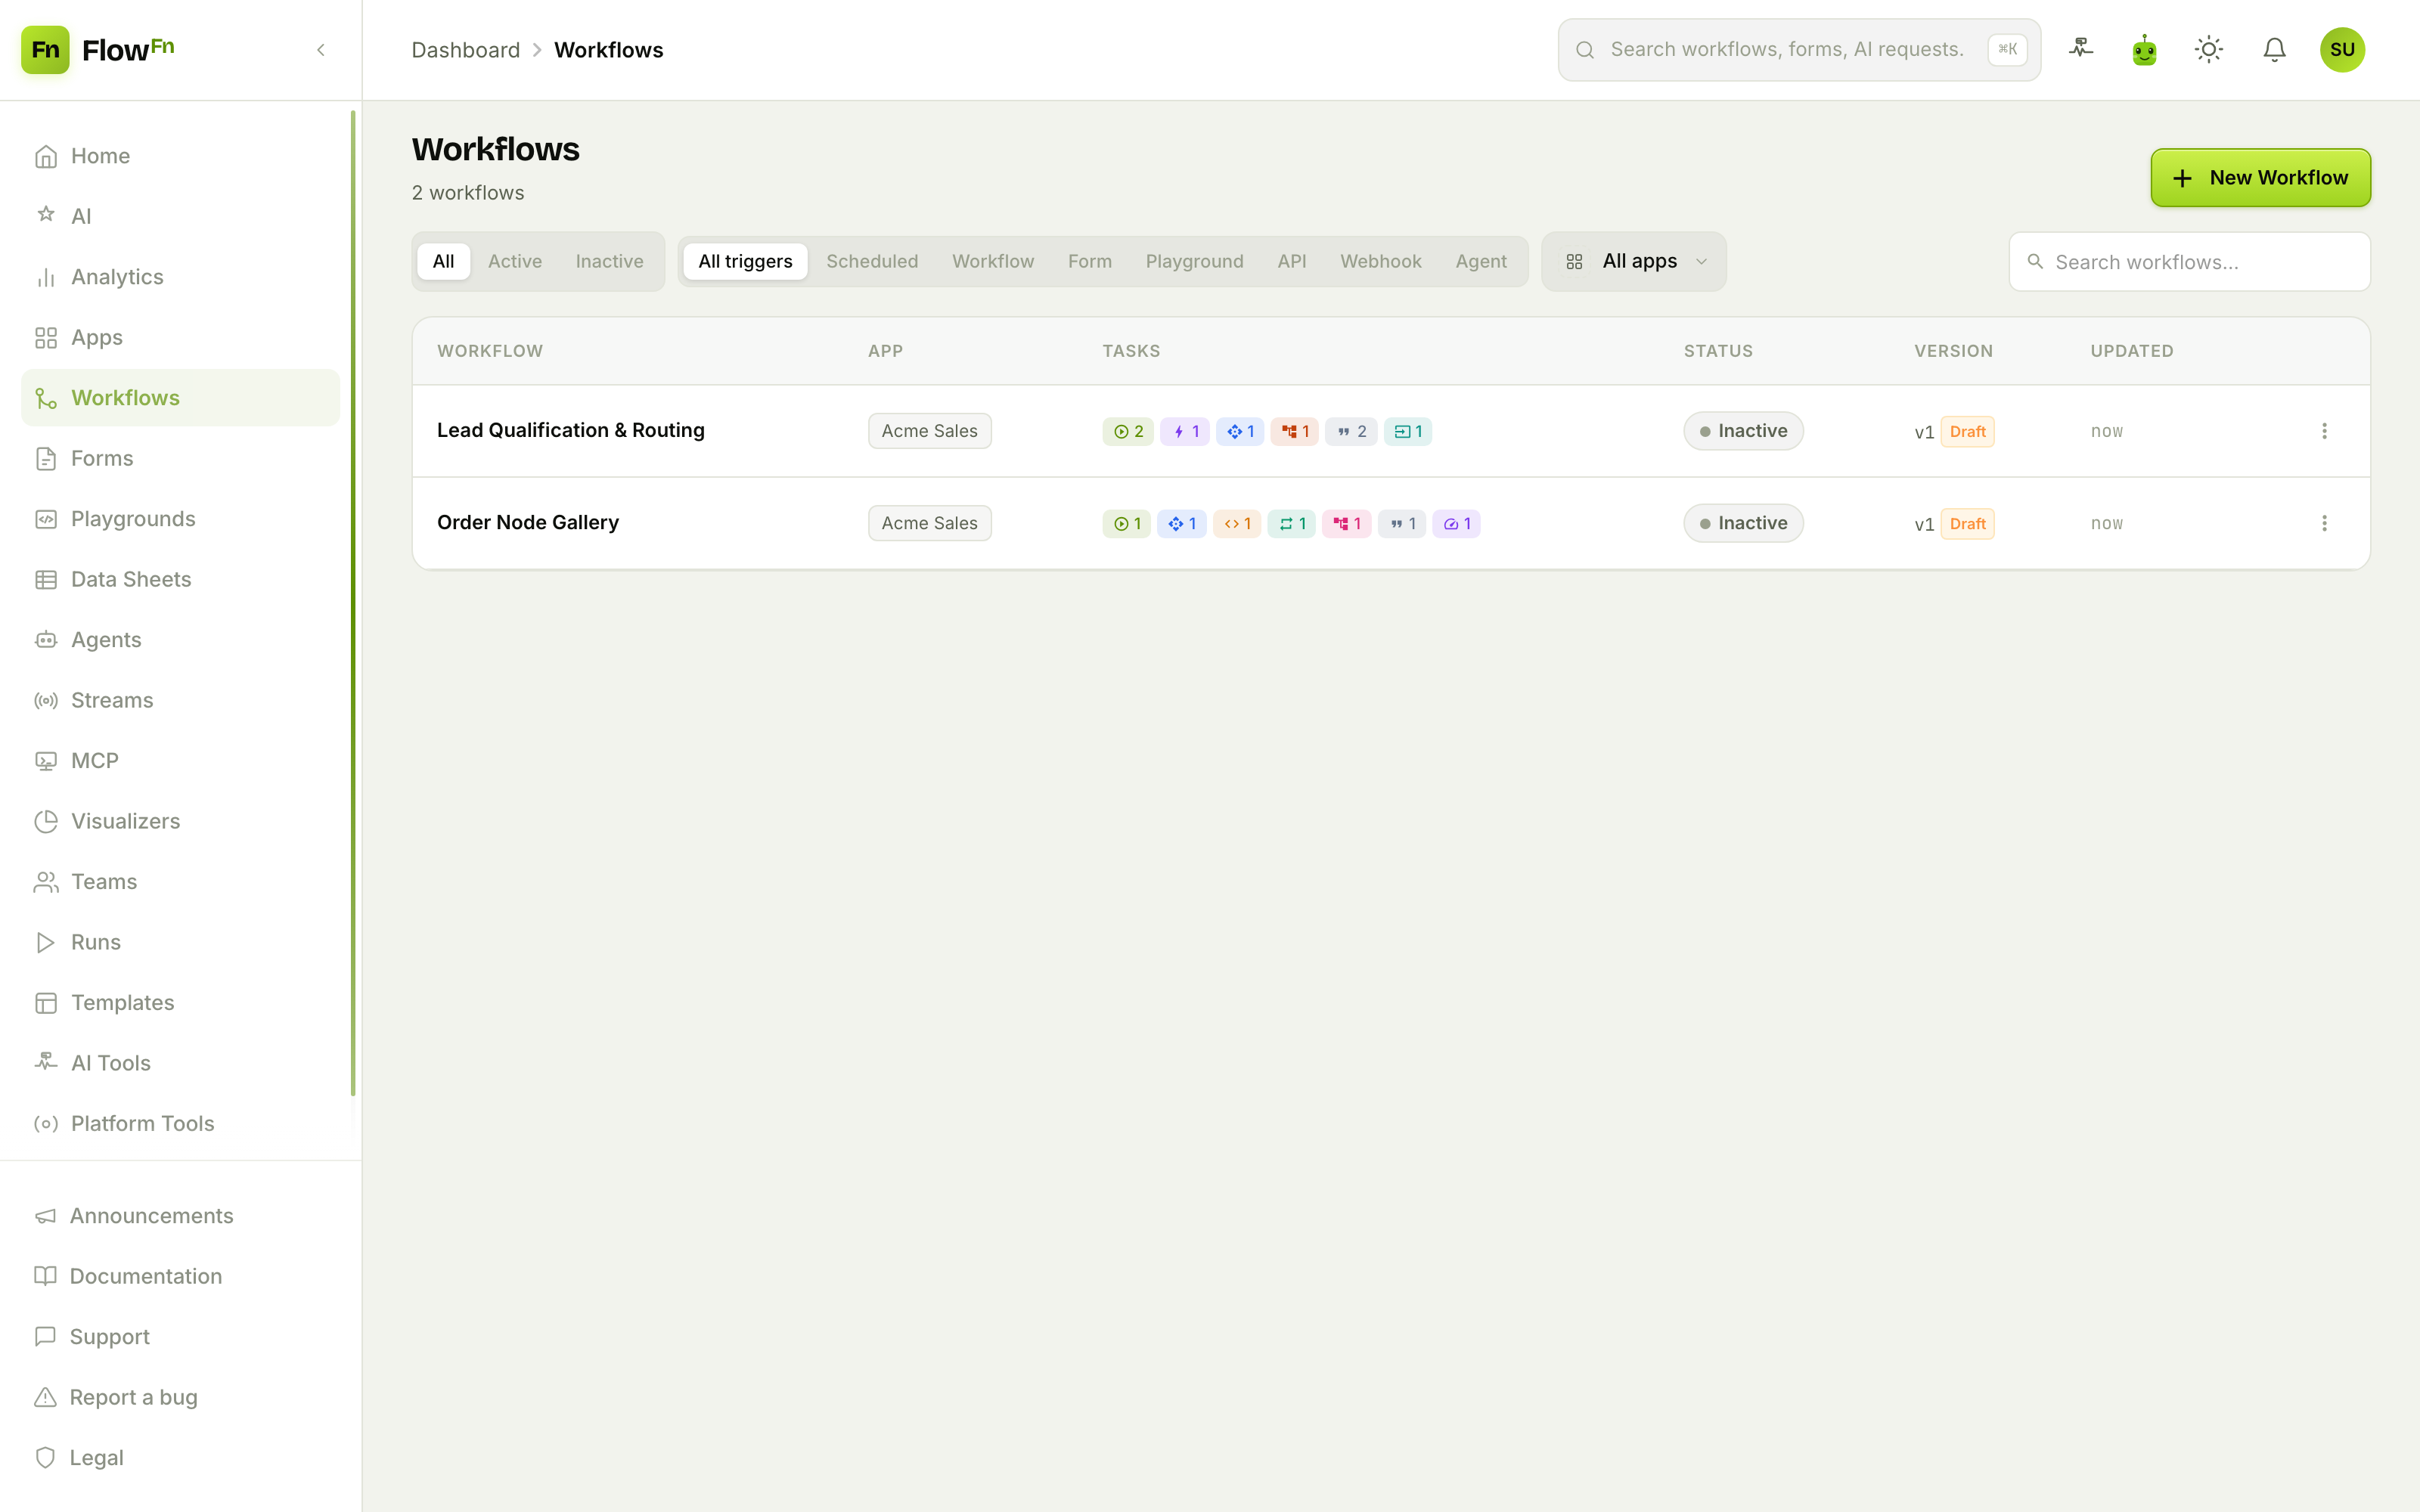
Hit New workflow, give it a name, and you land in the builder — an infinite canvas with an Add Node button in the top‑left and Test Run / Save in the top‑right.
The anatomy of a workflow
Here's the finished flow we're about to build. Read it left to right:
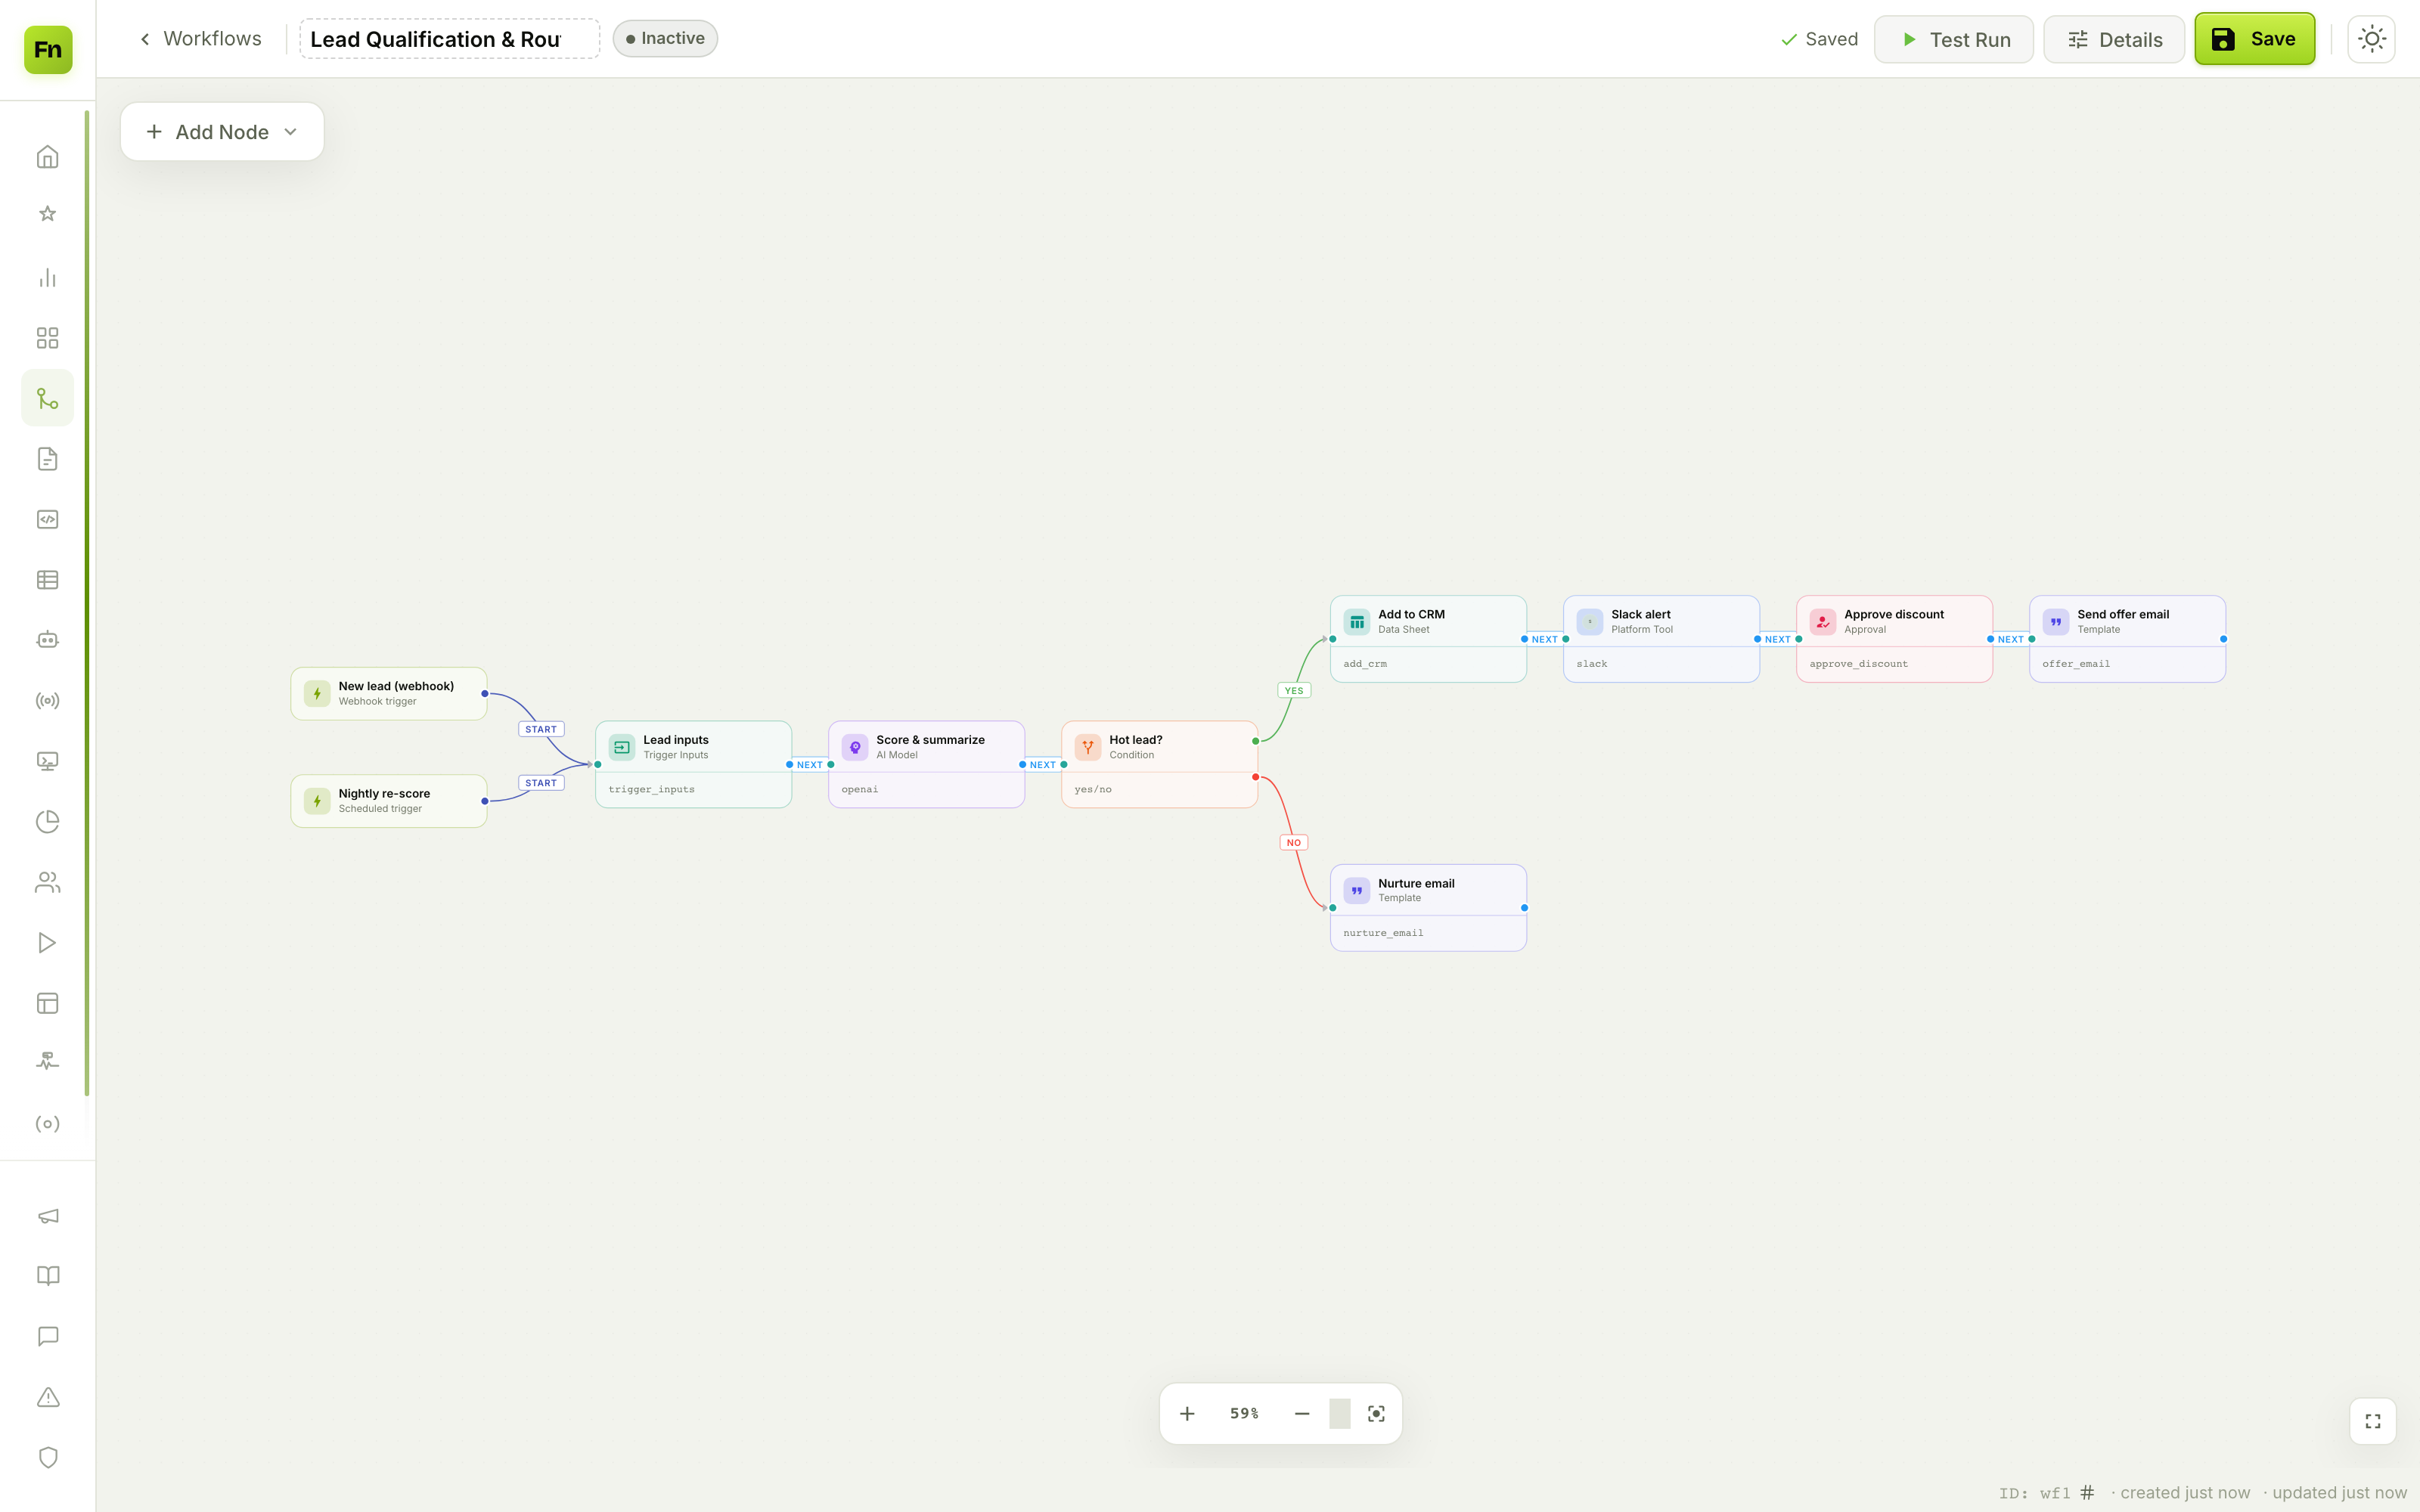
Three things to notice:
- Triggers sit on the left (the ⚡ nodes). This workflow has two — a Webhook for real‑time leads and a Scheduled trigger to re‑score stale ones nightly. Both flow into the same first task via a Start edge.
- Tasks are the coloured cards. Each shows its title, its type, and its reference code (the handle other tasks use to read its output).
- Edges carry the run from one node to the next: a normal Next edge, or — from the orange Condition node — a green Yes branch and a red No branch.
That branching is the whole point. Let's build it.
Step 1 — Start with a Trigger
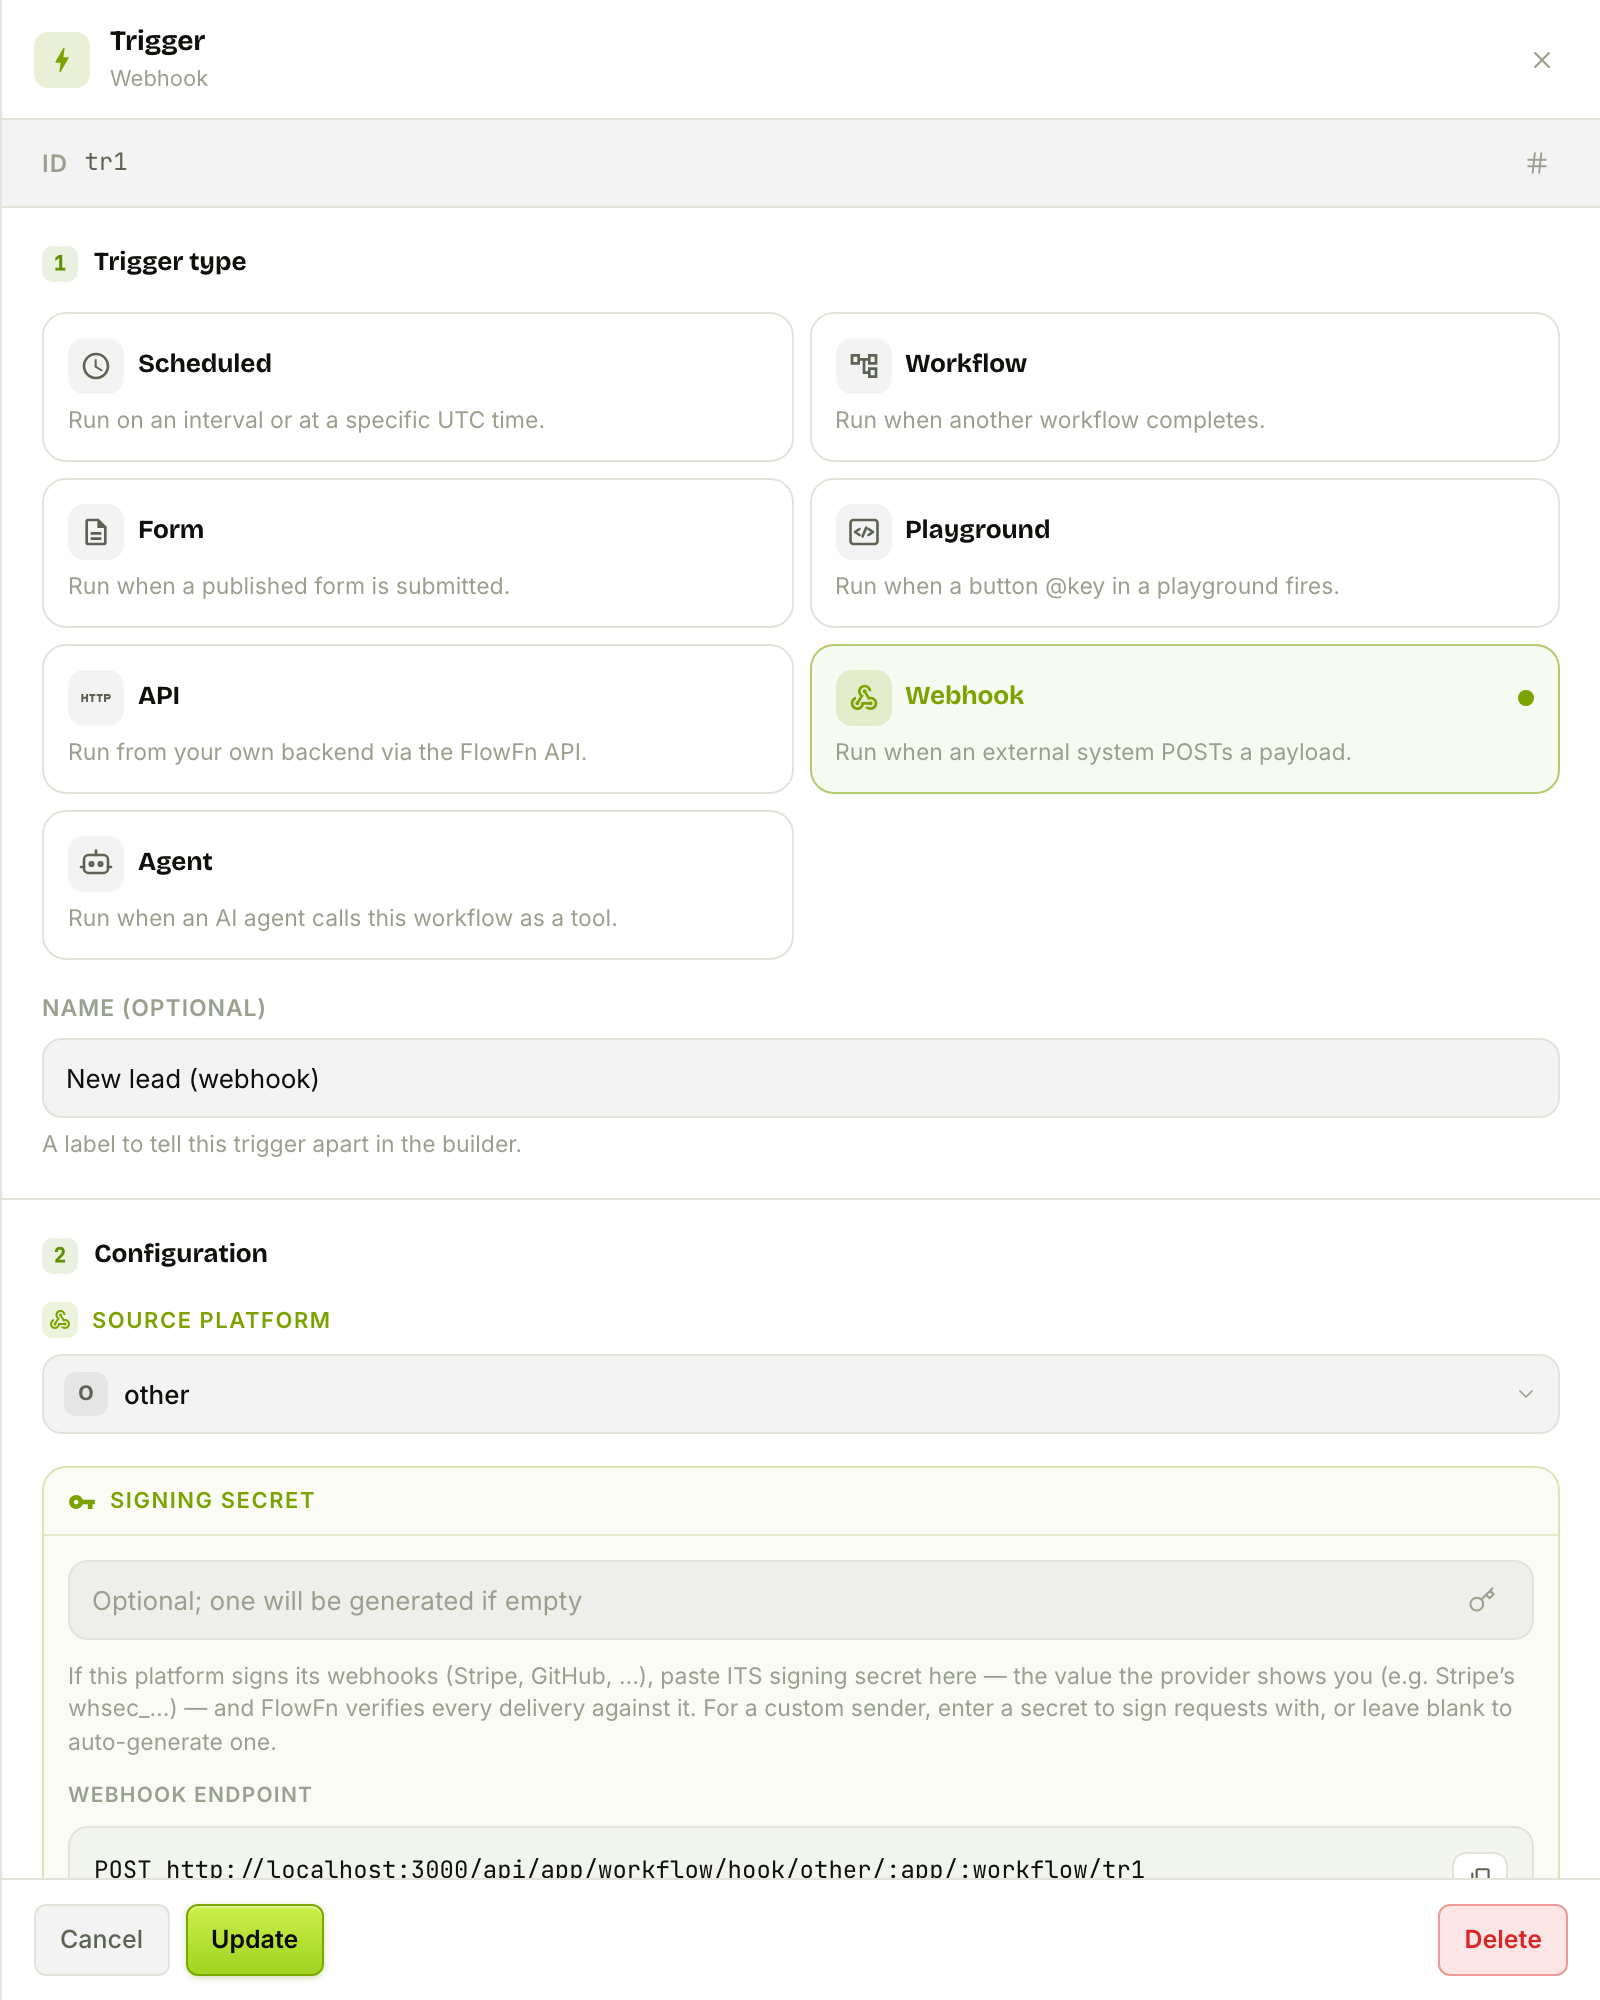
A Trigger is the entry point. It defines how a run starts and hands the incoming payload to everything downstream as {{$trigger…}} references. Click Add Node → Trigger and you get a picker with seven kinds:
| Trigger | Fires when… |
|---|---|
| Webhook | an external system POSTs a JSON payload to a public FlowFn URL (signature‑verified) |
| Scheduled | a repeating interval or specific UTC time is reached |
| API | your own backend calls the FlowFn API with the configured HTTP verb |
| Form | a published FlowFn form is submitted |
| Playground | a button @key in a playground fires |
| Workflow | another workflow completes |
| Agent | an AI agent calls this workflow as a tool |
We pick Webhook. FlowFn generates a public POST endpoint you point your lead source at (a landing‑page form, Typeform, HubSpot, Stripe…). Paste the provider's signing secret and FlowFn verifies every delivery; paste one real payload as the sample and it derives the field paths (data.object.email, company, …) that show up in the reference picker downstream.
Tip: A workflow can hold several triggers. We added a second Scheduled trigger so the same pipeline can also run as a nightly batch — no duplicate logic.
Step 2 — Normalize with Trigger Inputs
The moment you have more than one trigger, their raw field names diverge — a form calls it email, a webhook calls it contact.email. The Trigger Inputs node fixes that. It defines one unified set of output keys, then lets you map each trigger's raw fields into them, so every task downstream reads one stable shape.
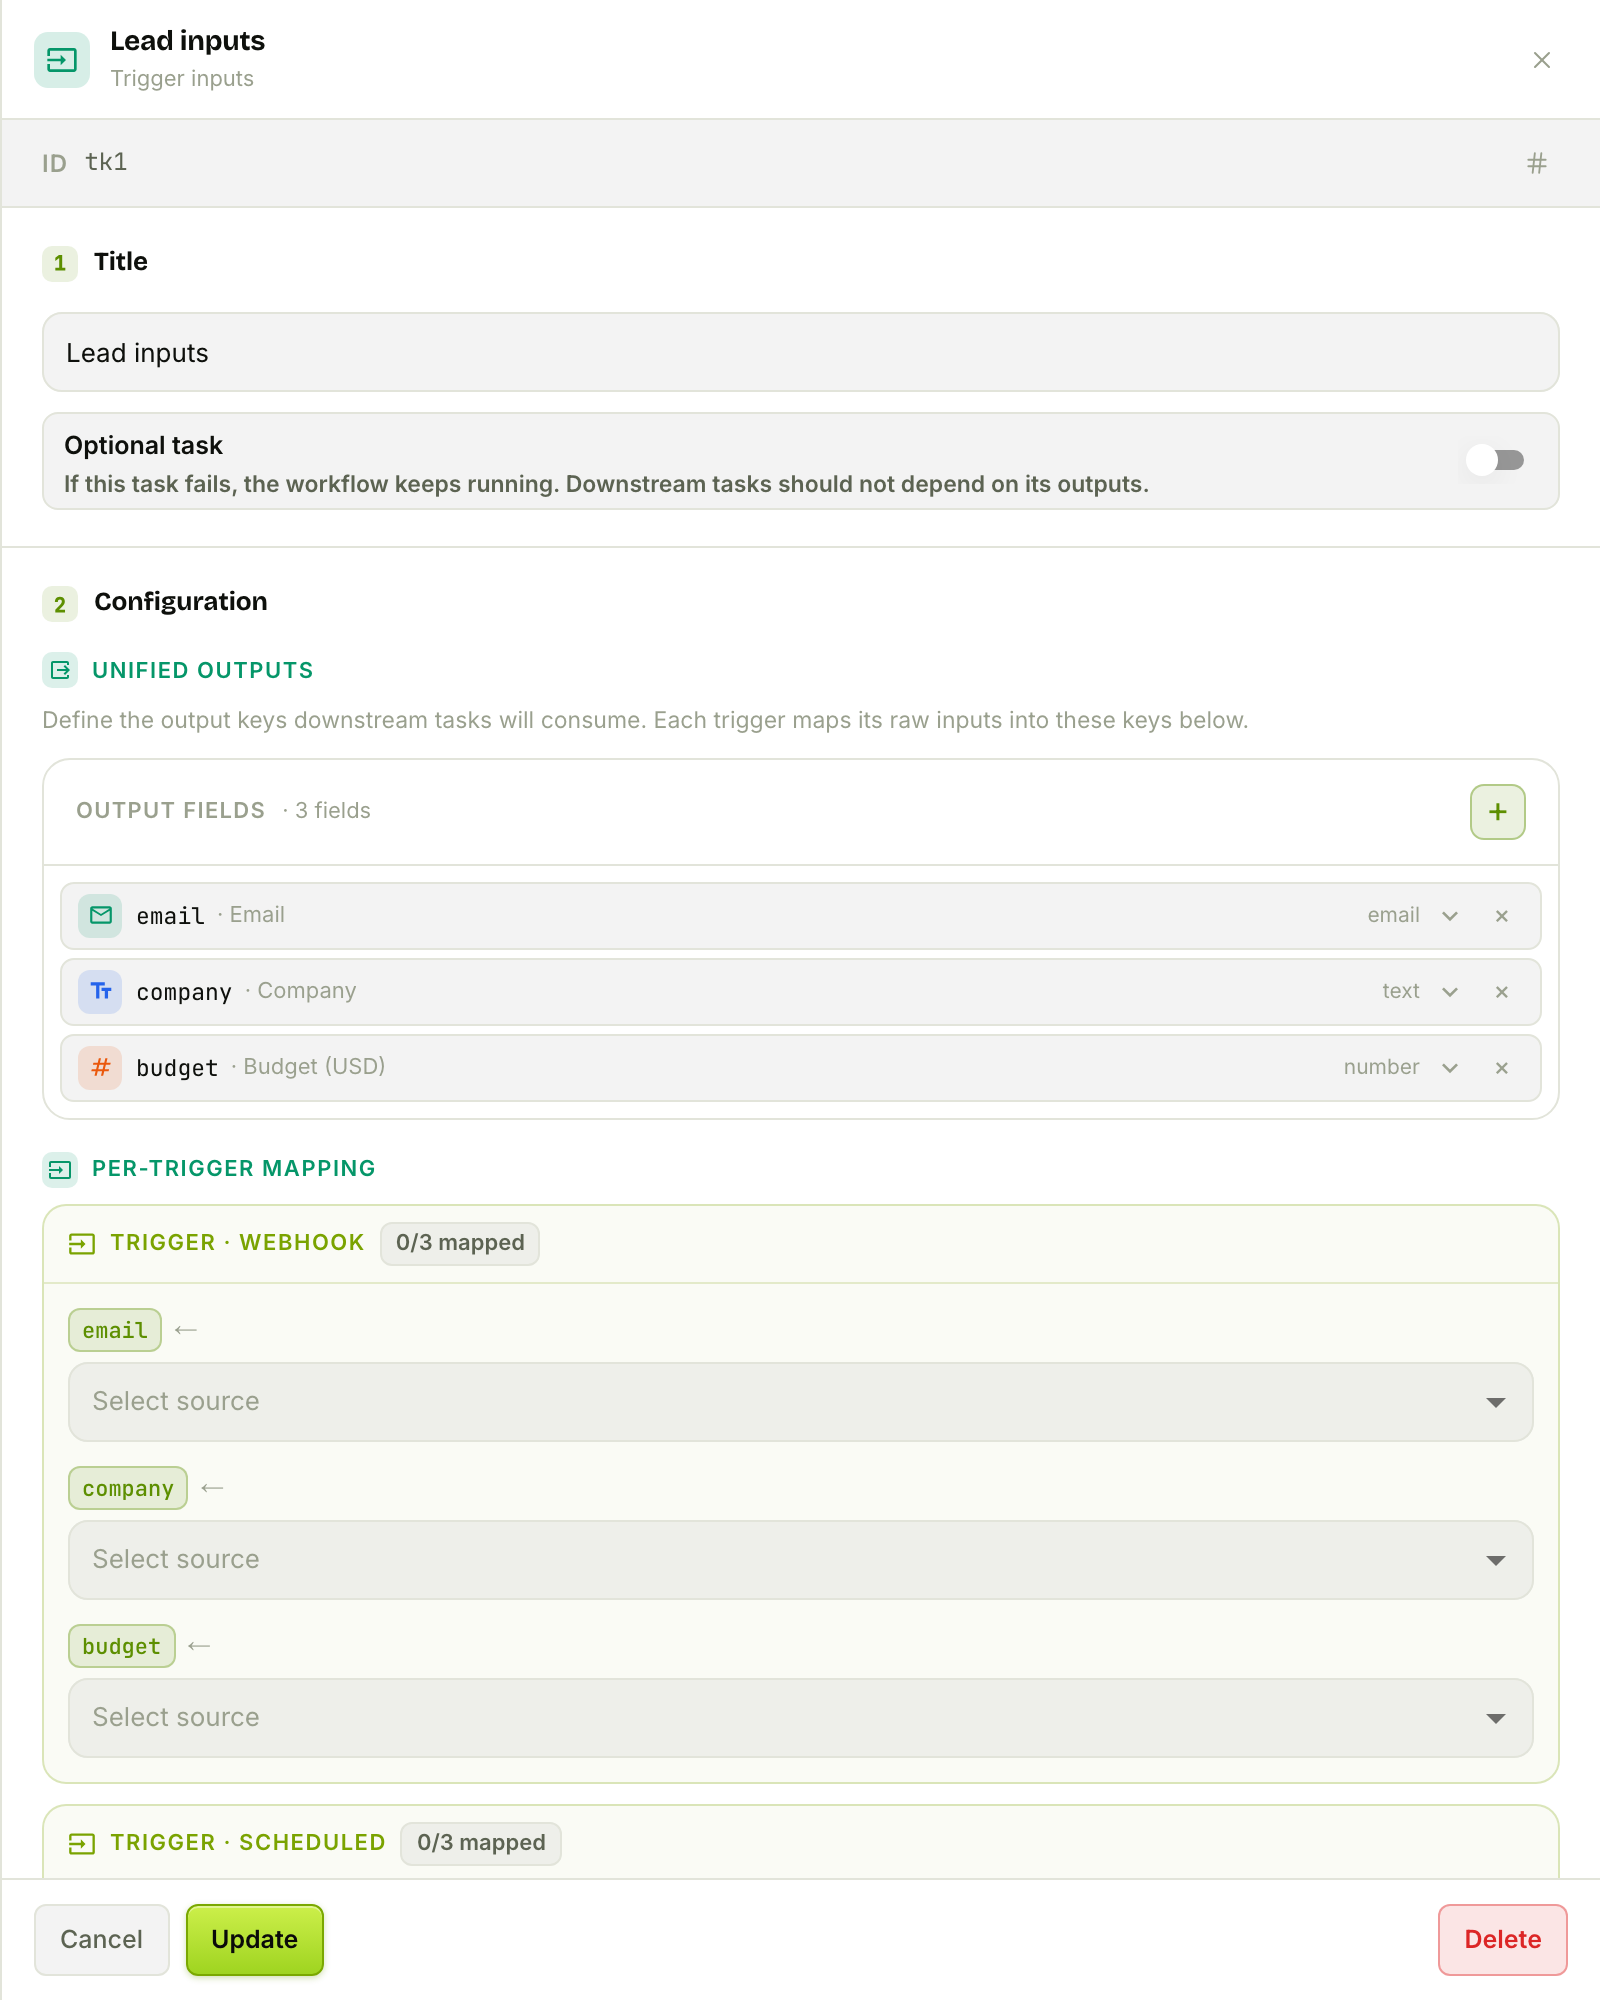
Here we declare three unified outputs — email, company, budget — and map both the Webhook and the Scheduled trigger into them. It must be the workflow's start node, and it only unlocks once you have two or more triggers (it's meaningless with one).
Meet the node palette
Click Add Node and you see the full toolbox, grouped into Trigger, Action, and Logic:
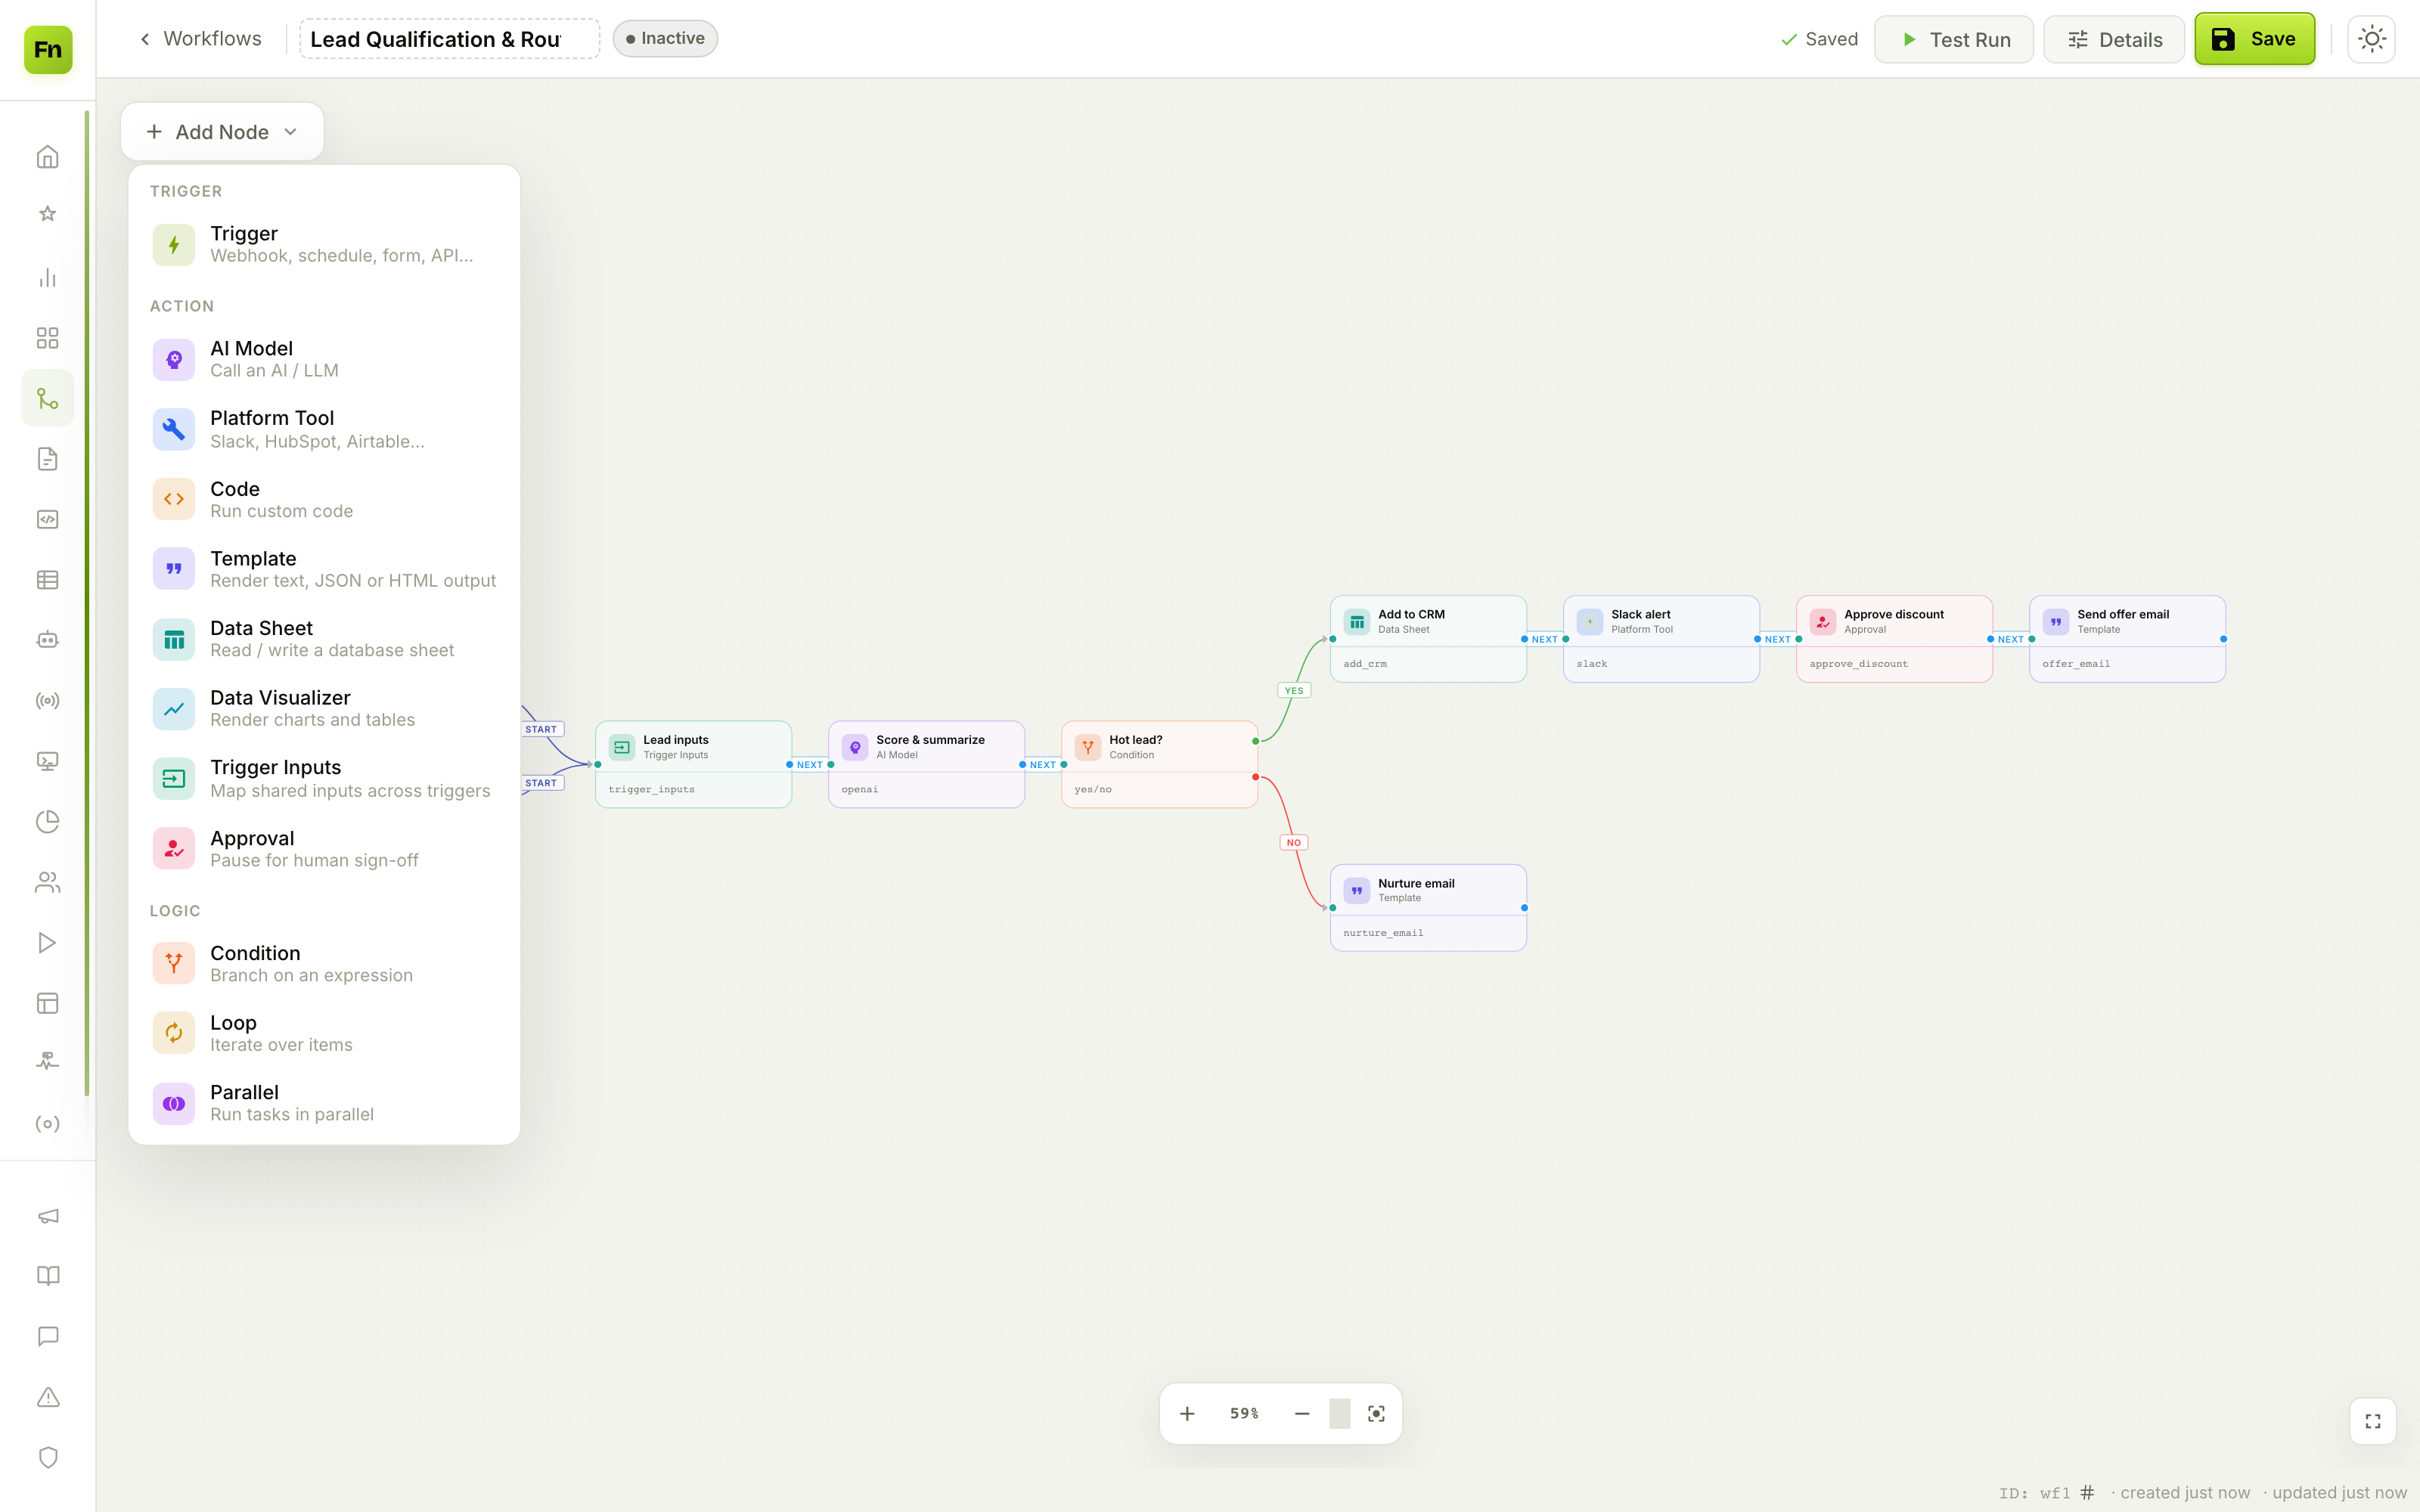
That's the entire vocabulary of a FlowFn workflow:
- Action nodes do something — call an AI, hit an integration, run code, render text, read/write data, append to a chart, pause for a human.
- Logic nodes control the flow — branch, loop, or fan out.
We'll use most of them right now, then cover the rest in the tour.
Step 3 — Score the lead with an AI Model
The AI Model node runs one LLM call. You pick a provider registry (e.g. OpenAI / Anthropic / Gemini, in a text or structured flavor), pick a model, and write an instruction. FlowFn automatically injects the trigger inputs and every earlier task's outputs as context, so the model already "sees" the lead.
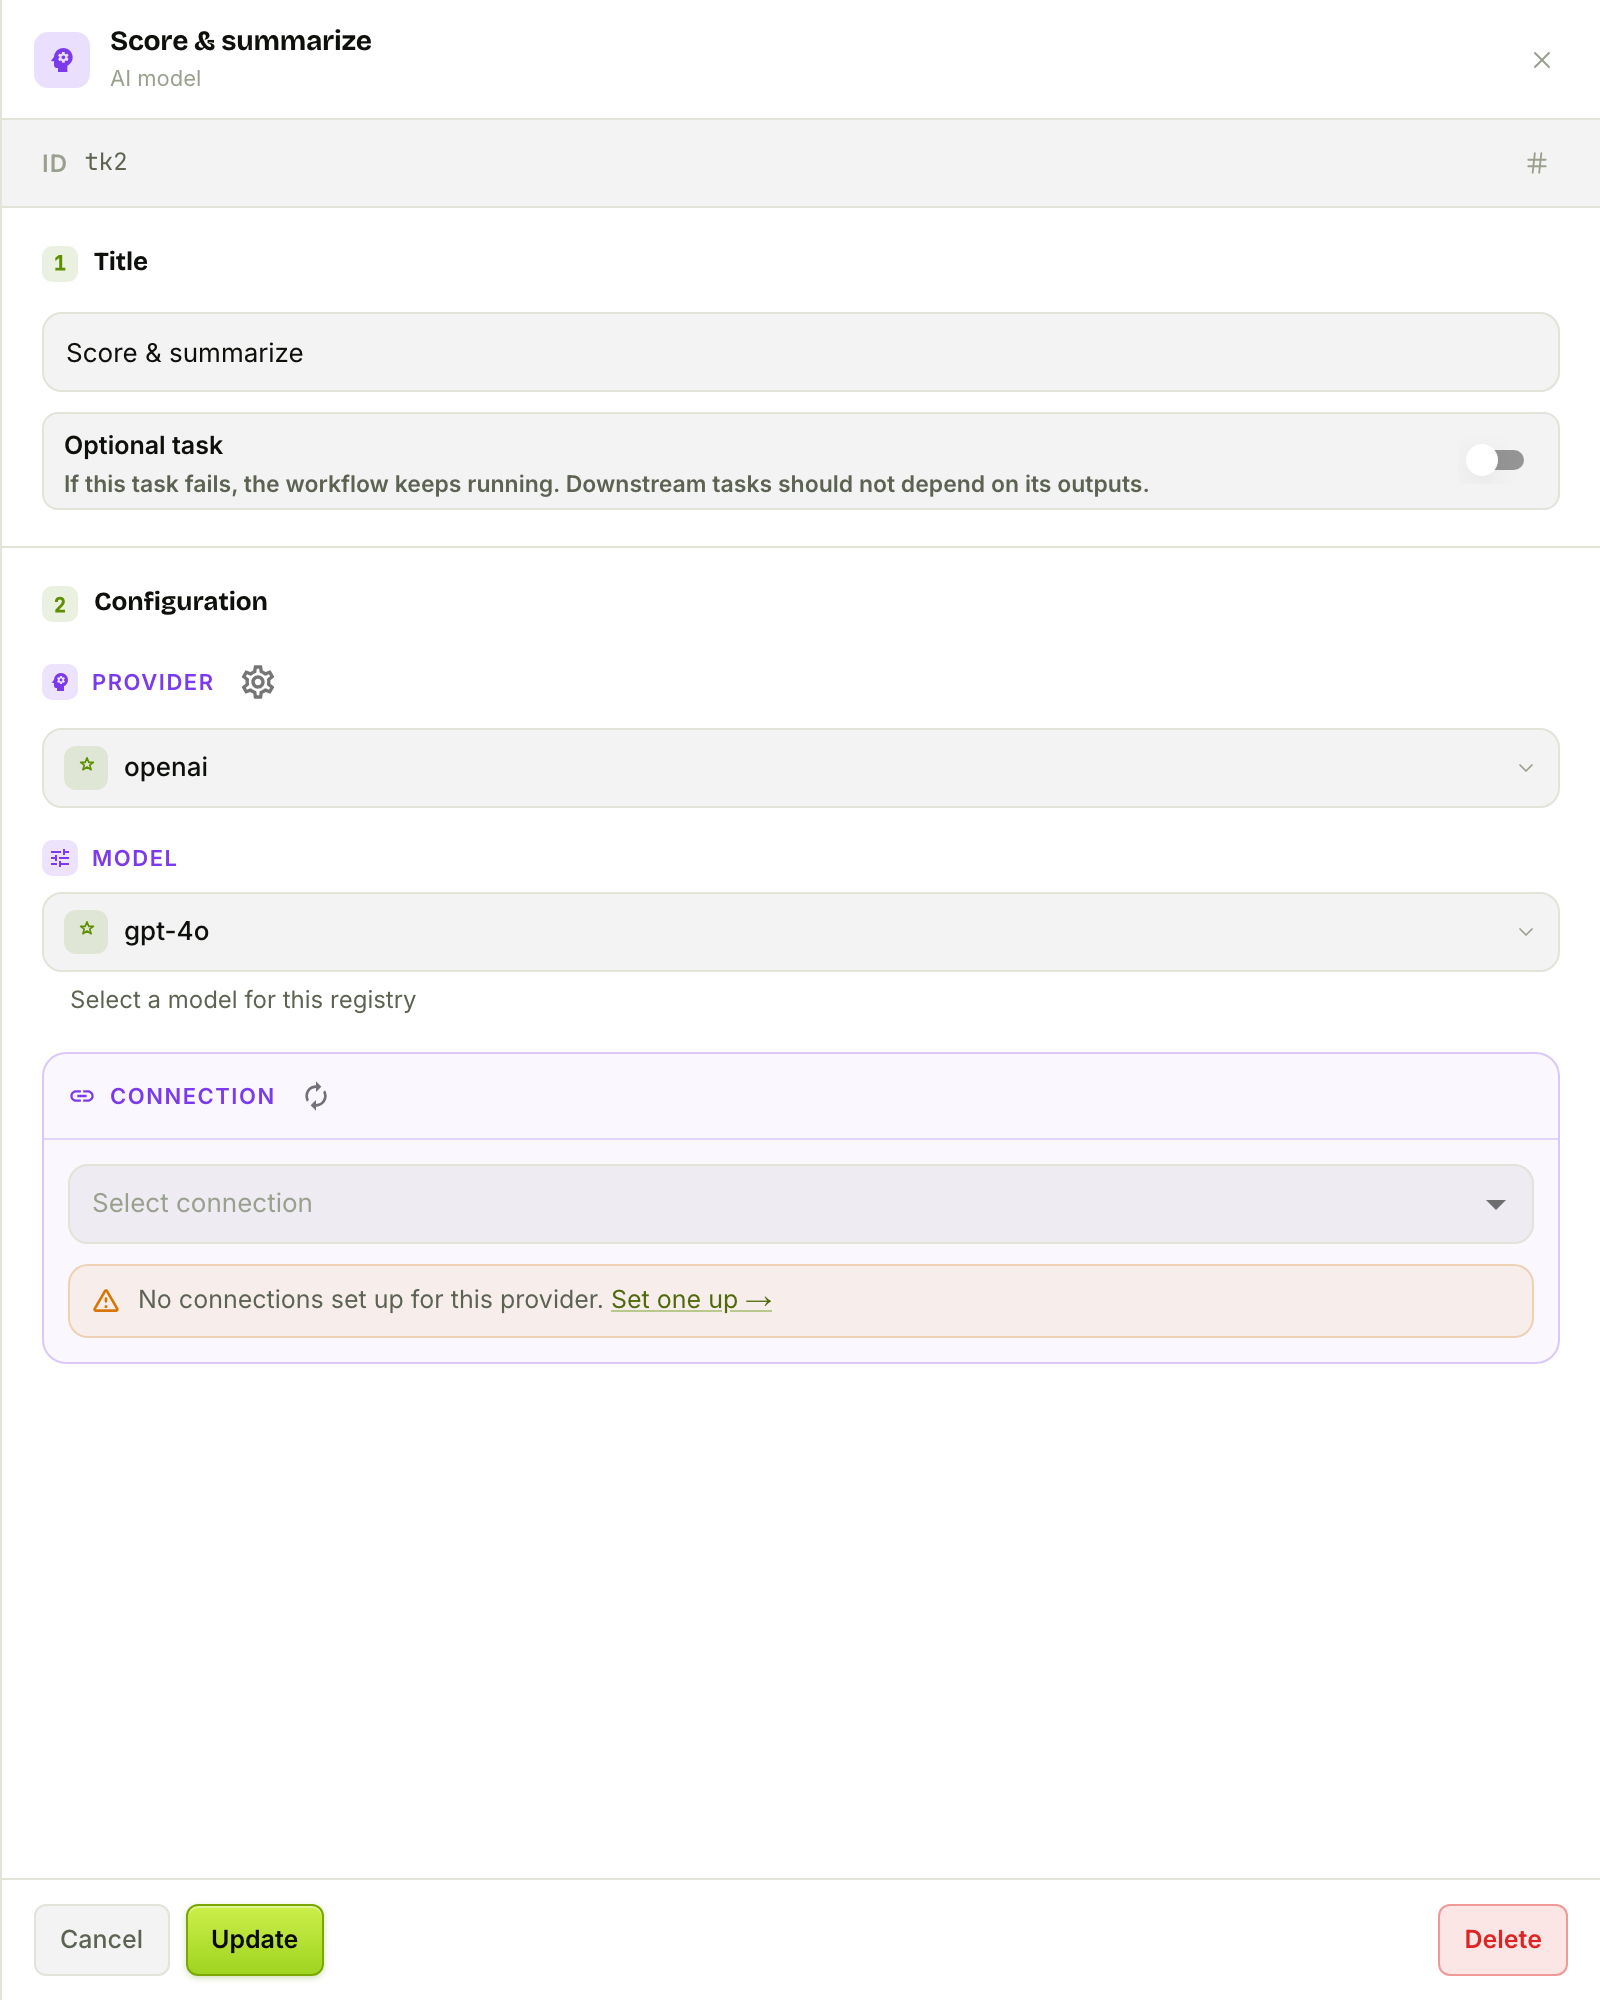
The real power is structured output: define output fields like score (number), summary (text), and segment (text), and a structured registry forces the model to return valid, typed JSON. Those become {{$task.<ref>.outputs.score}} for the next node.
Runs use FlowFn's platform AI key when your plan allows, or your own key (BYOK) via a team connection — the amber "no connections" hint just means you haven't linked one yet.
Step 4 — Branch with a Condition
The Condition node is FlowFn's fork. It evaluates a single expression — a left value, an operator, and (for binary operators) a right value — and routes the run down exactly one of two wired paths.
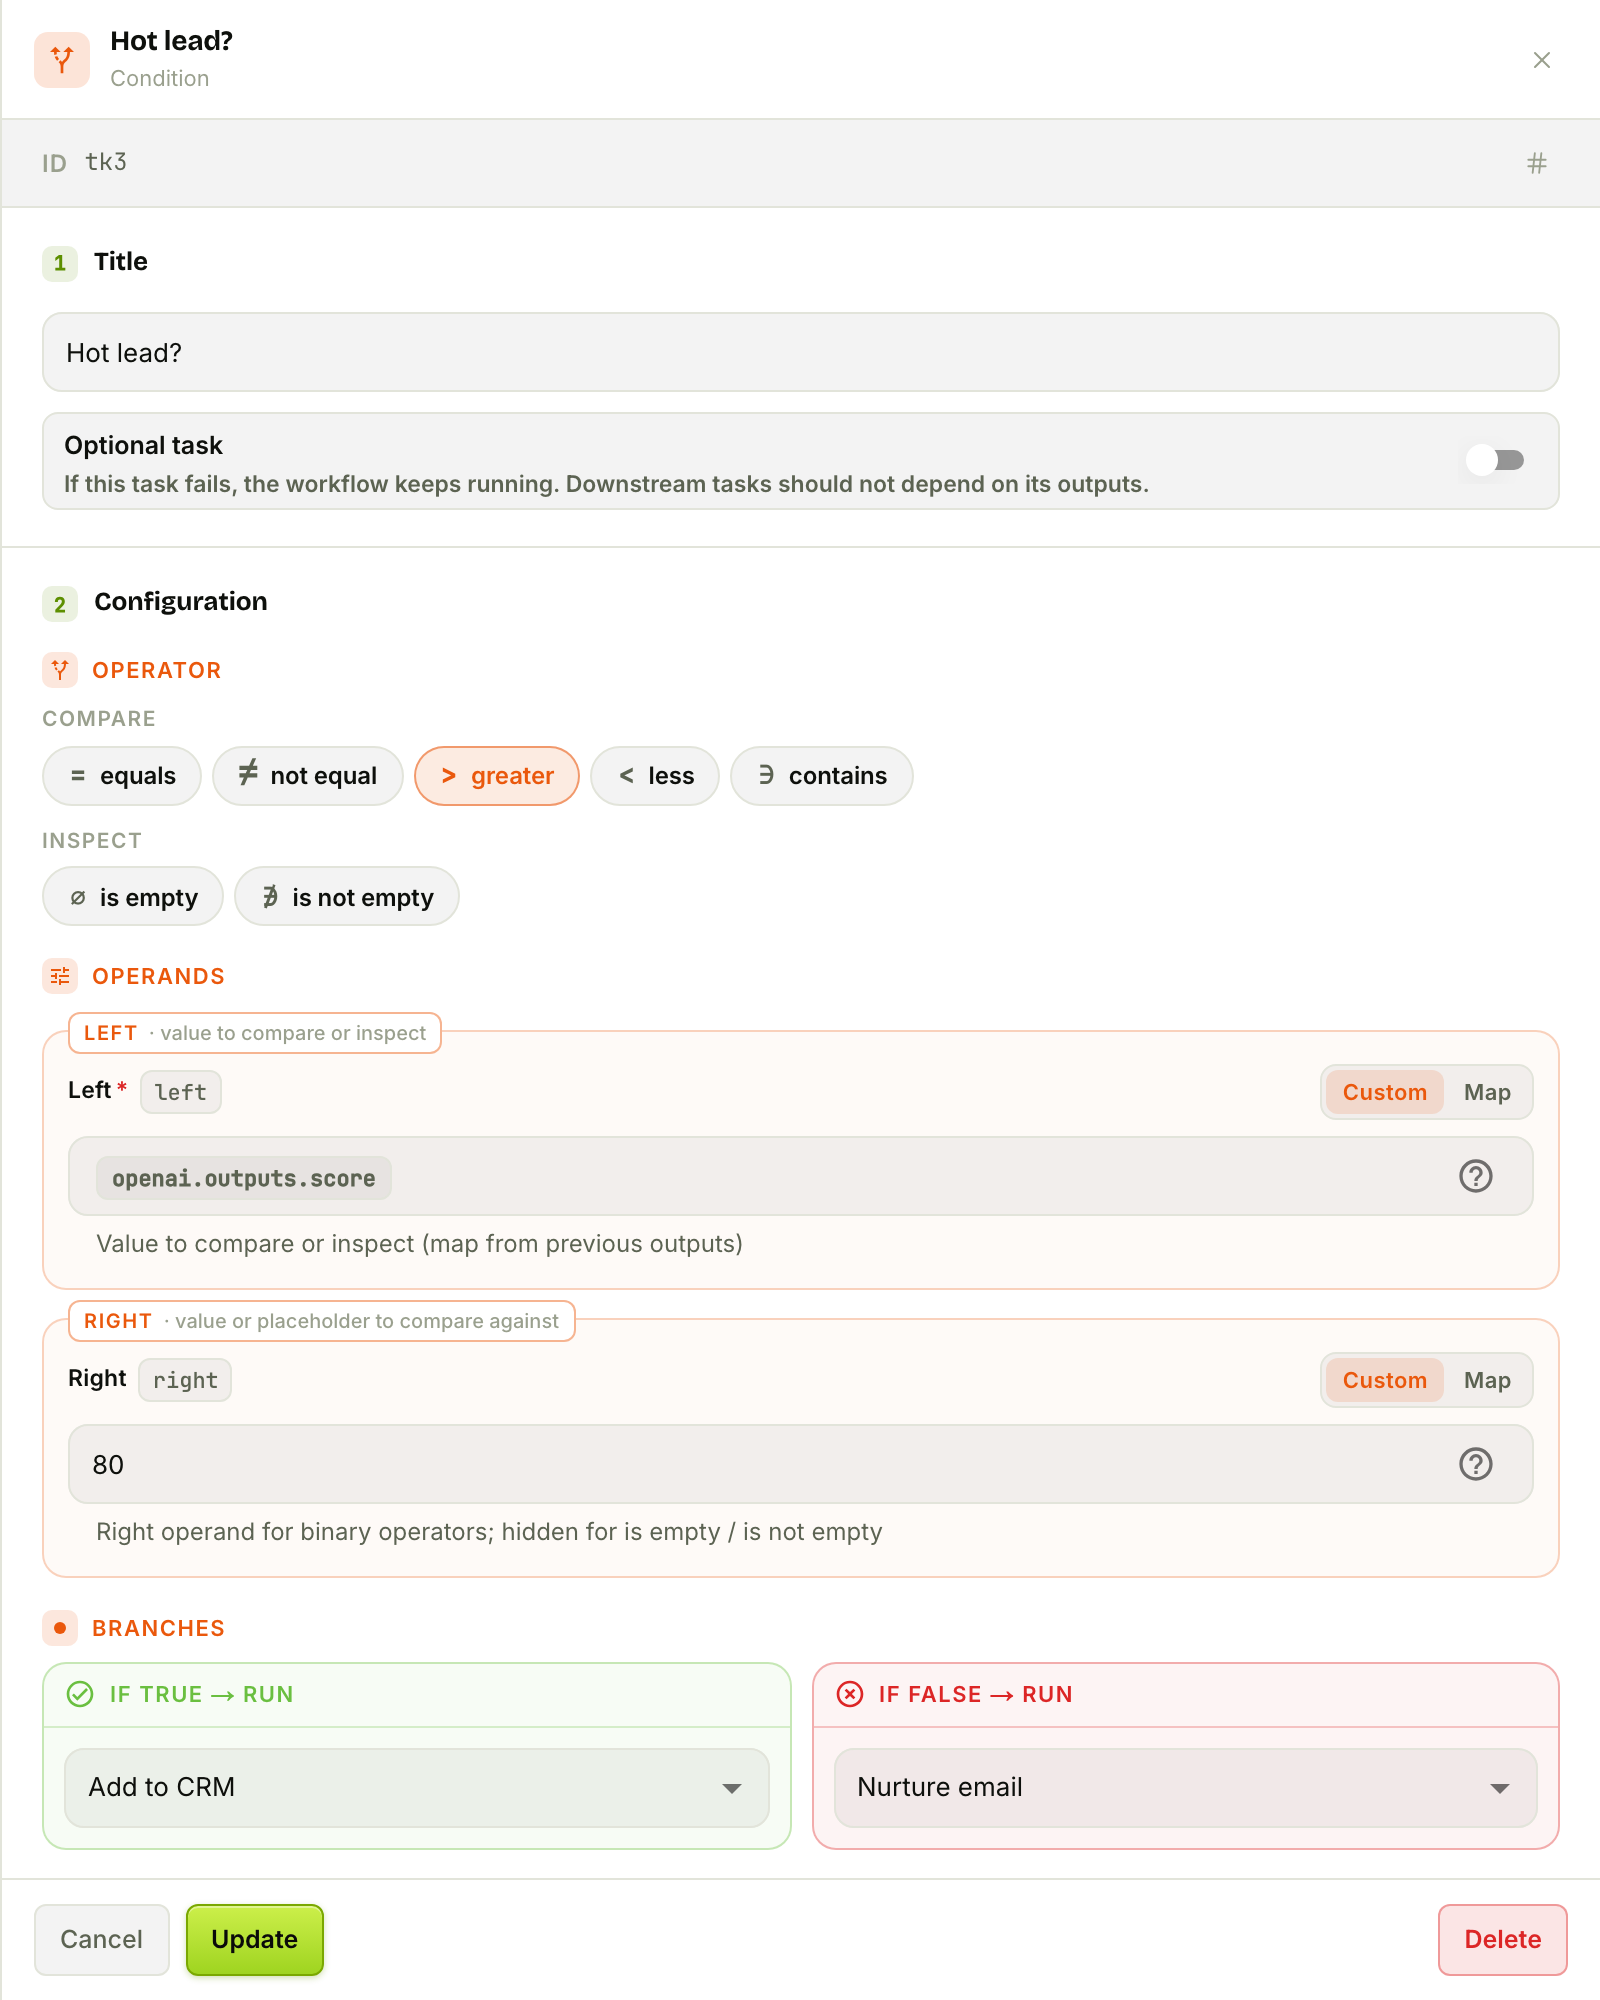
Here: openai.outputs.score greater than 80. Operators cover both comparison (equals, not equals, greater, less, contains) and inspection (is empty, is not empty). It's fully deterministic and rule‑based — no AI is involved in the decision. A Condition has no ordinary "Next"; the only way forward is the green If true → run branch (here, Add to CRM) or the red If false → run branch (here, Nurture email).
Step 5 — Persist to a Data Sheet
Hot leads should land in your CRM. Data Sheets are FlowFn's built‑in tabular store (Database → Sheet → rows). The Data Sheet node reads or writes rows as a workflow step.
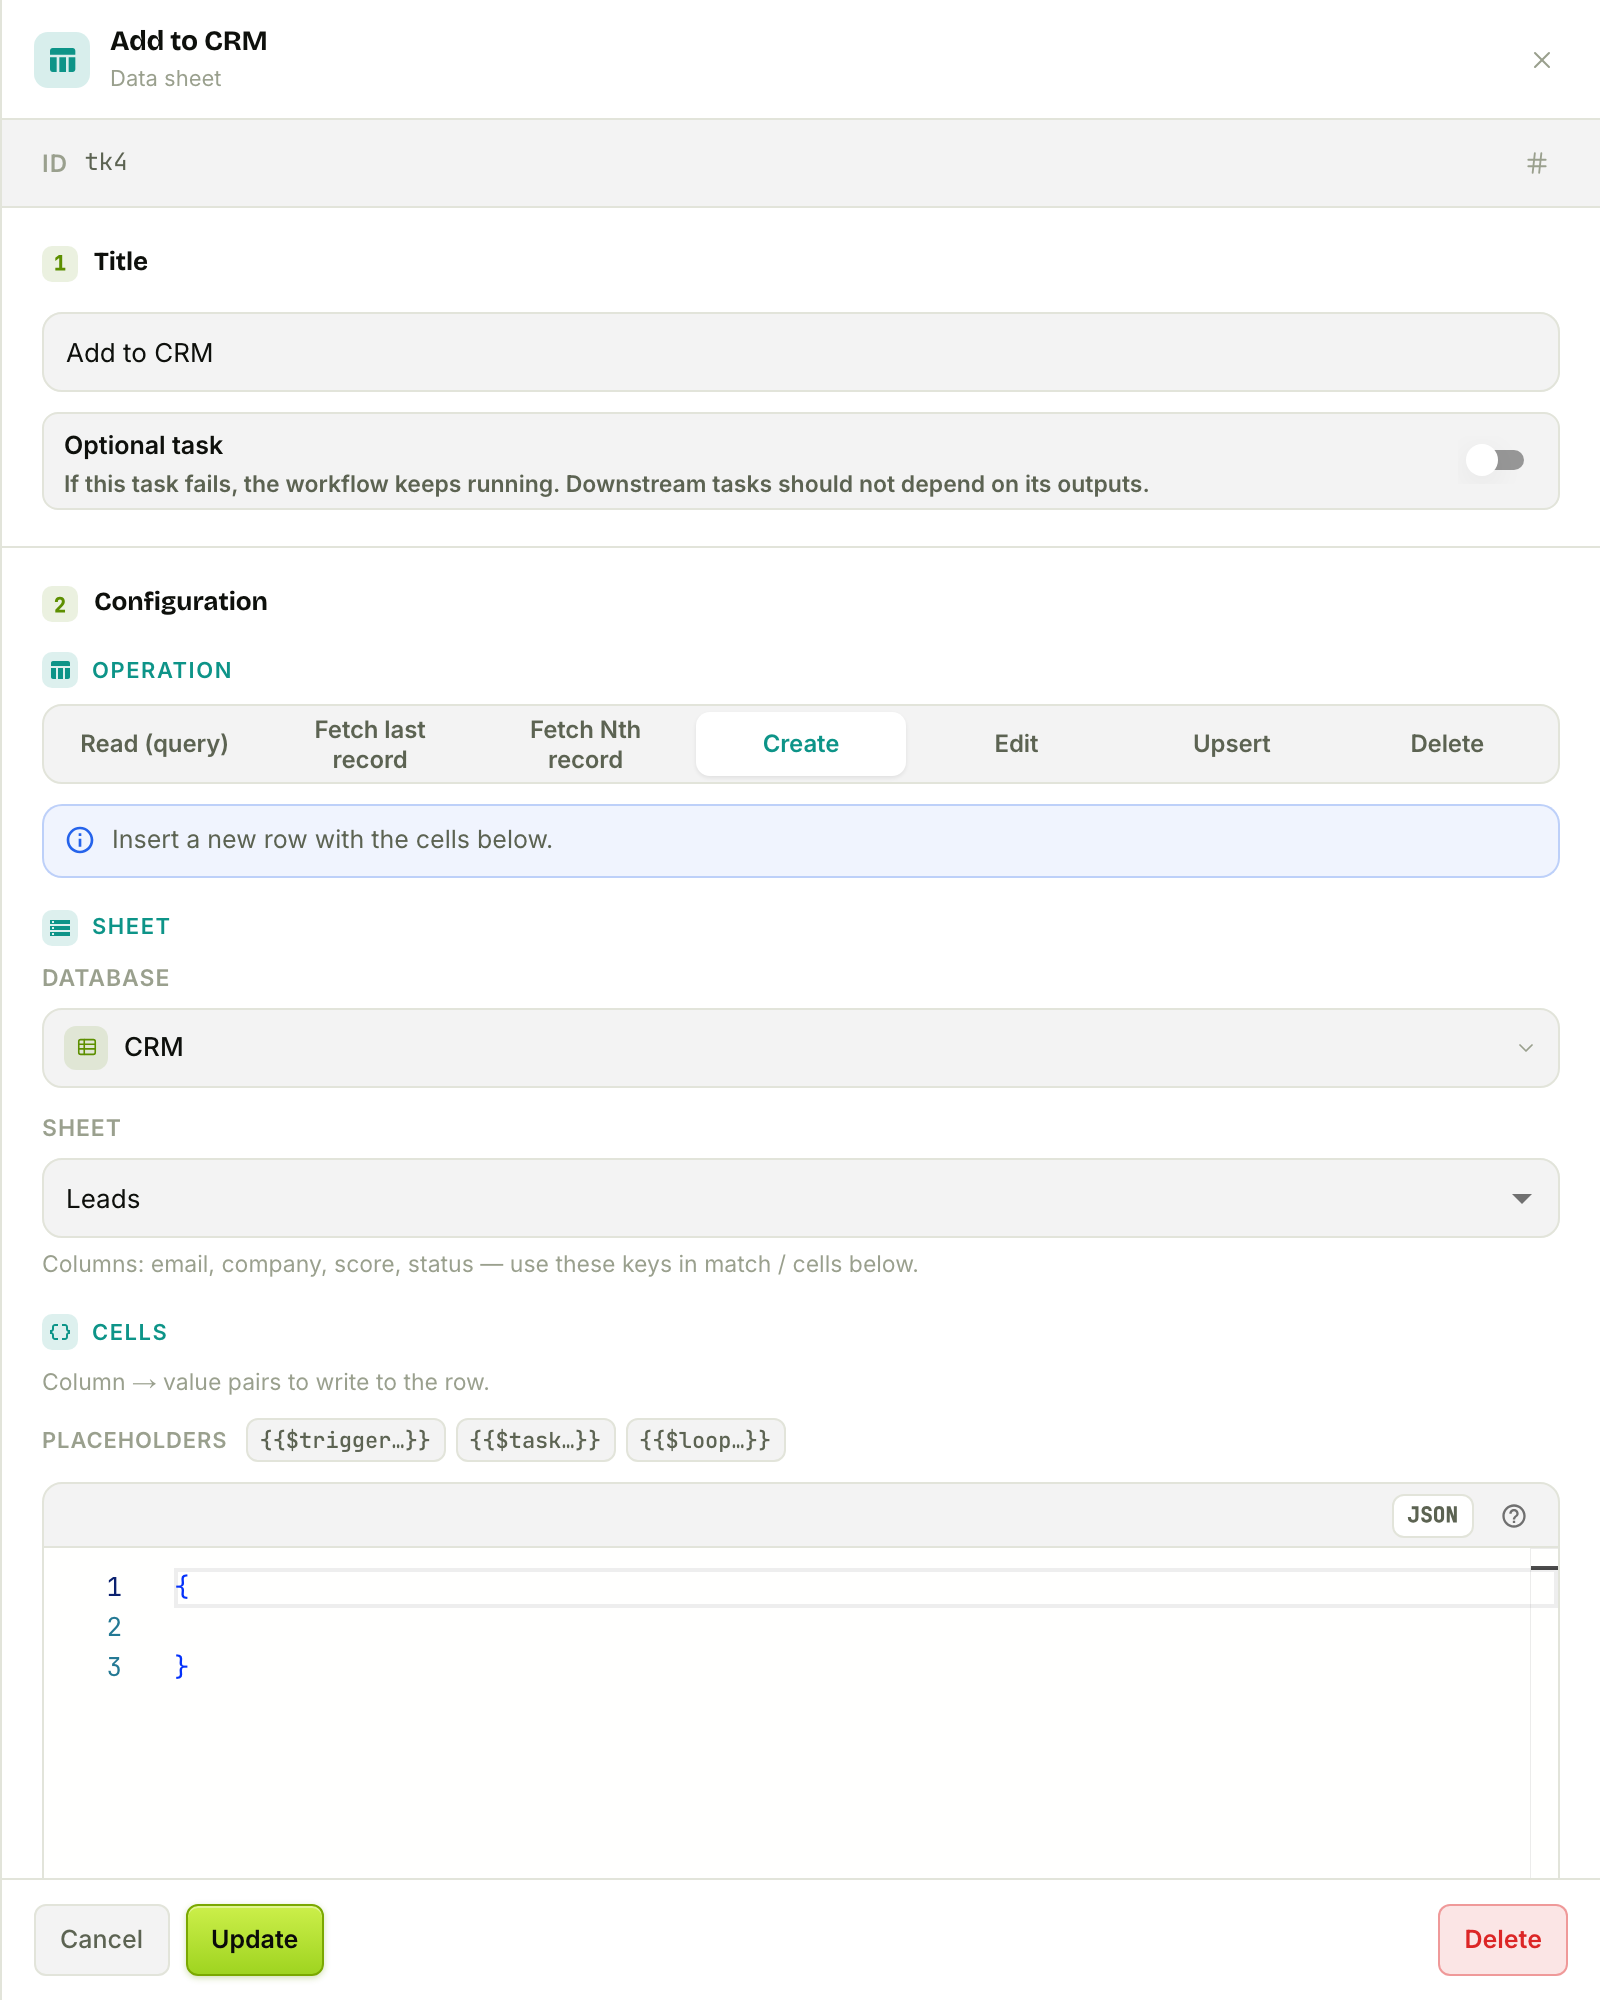
Pick an operation — Read (query), Fetch last, Fetch Nth, Create, Edit, Upsert, or Delete — then pin a database and sheet. We use Create on CRM → Leads and map the cells from trigger and AI outputs. Edit/Upsert/Delete locate a row via a match filter ({ "email": "{{$trigger.email}}" }); upsert inserts when nothing matches.
Step 6 — Notify with a Platform Tool
Platform Tool nodes run a single action on a third‑party integration — Slack, HubSpot, Gmail, Stripe, Jira, custom webhooks, and more.
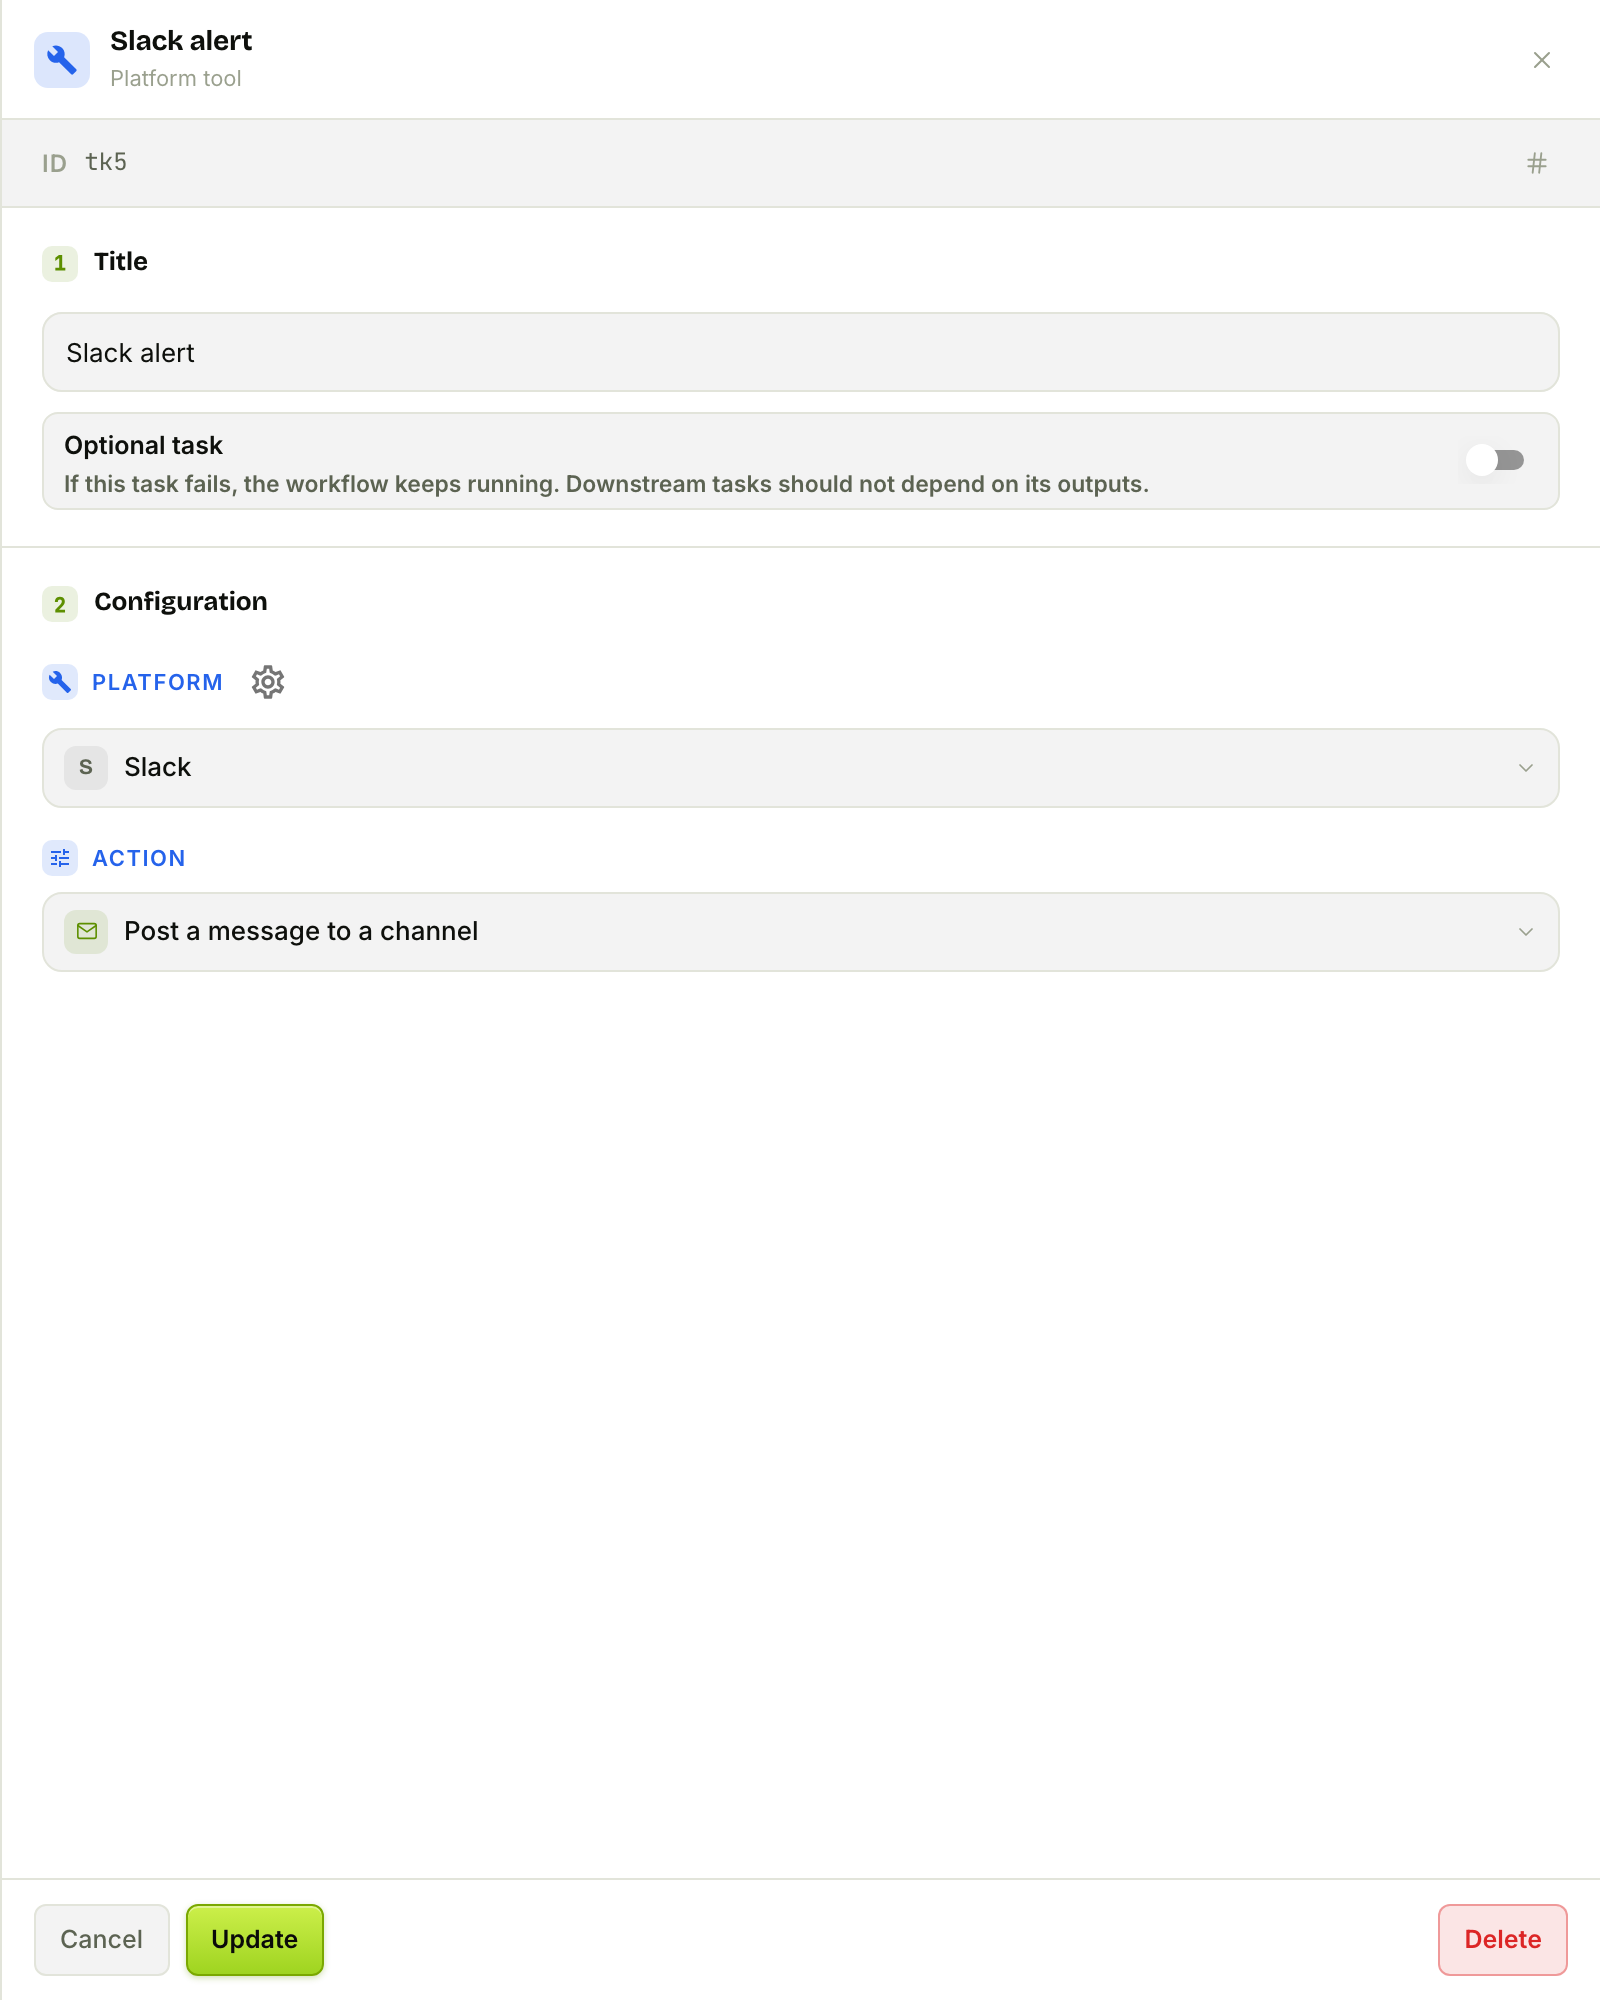
Pick the platform (Slack), pick one of its actions (Post a message to a channel), and bind the team connection whose OAuth/API credentials get injected at run time — you never paste secrets into the node. Fill the action's inputs with literals or {{ }} references (the channel, and a message wired from the lead's data). Behind the scenes FlowFn checks your plan can use the tool and that any paid integration has an active subscription.
Step 7 — Gate it with an Approval
Before a discount goes out, a human should sign off. The Approval node is a human‑in‑the‑loop gate: when the run reaches it, FlowFn pauses the run, emails your chosen approvers an approve/reject link, and waits.
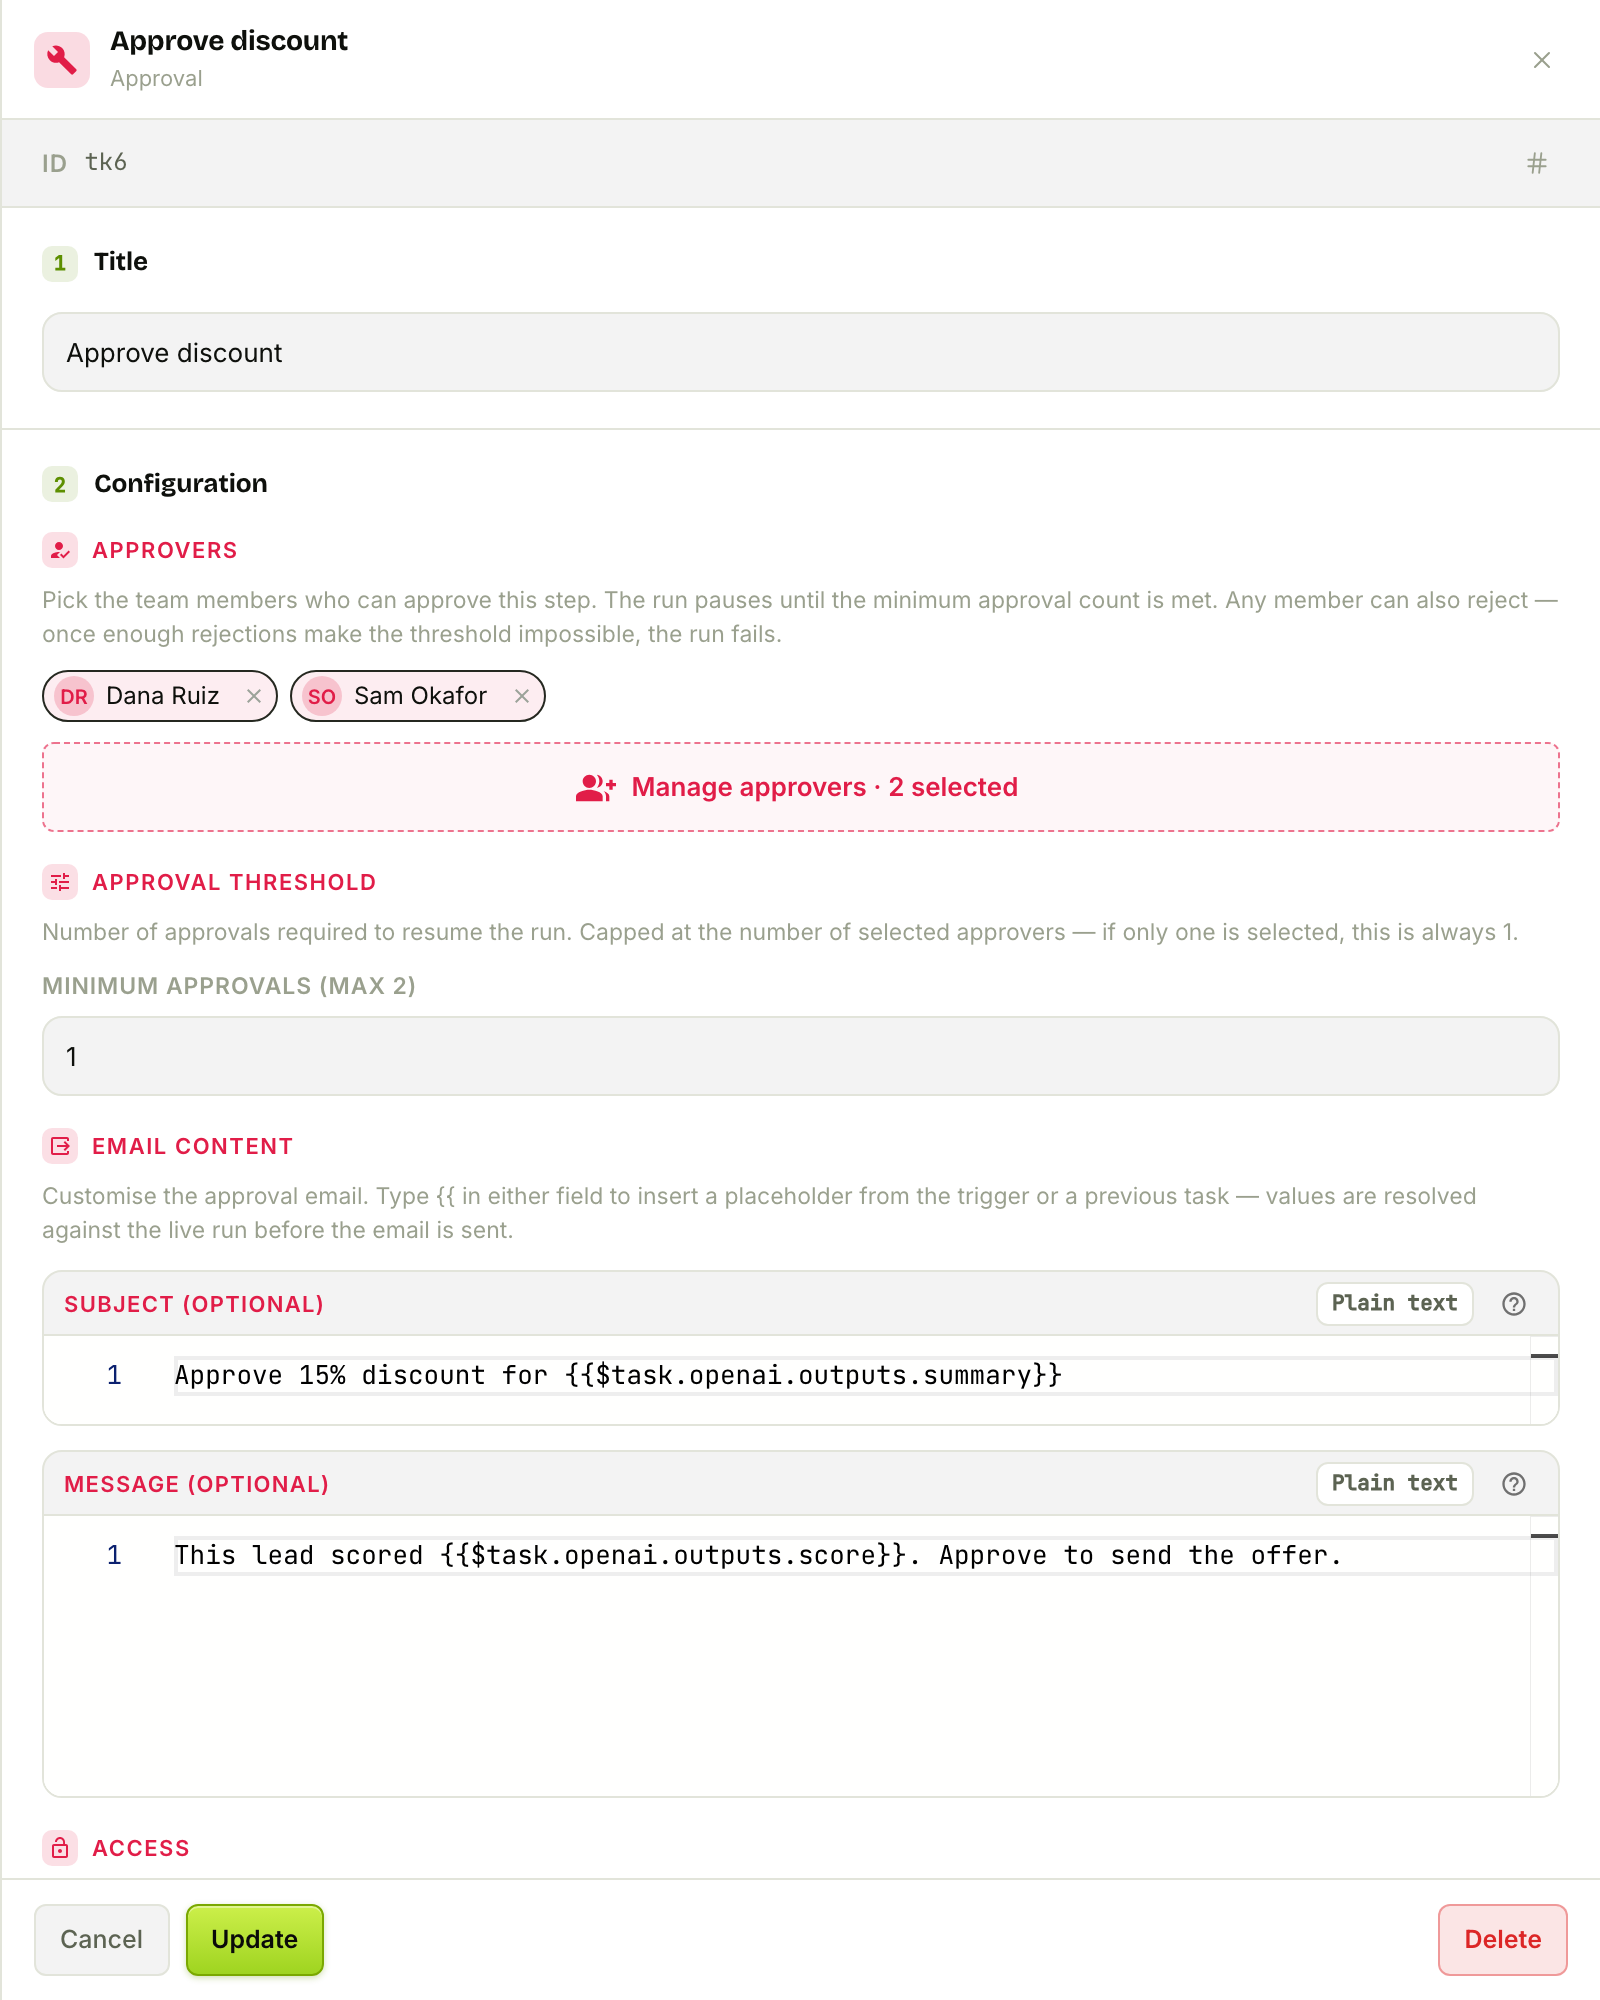
Choose approvers from your team, set a minimum approvals threshold, and customize the email — the Subject and Message accept {{ }} placeholders so reviewers see real context (Approve 15% discount for {{$task.openai.outputs.summary}}). Approvers can decide on a sign‑in‑free public page (authorized by a signed link) or on the dashboard. The run resumes once the threshold is met; enough rejections fail it. The approver list is snapshotted when the email sends, so editing the workflow later won't disturb in‑flight approvals.
Step 8 — Compose the email with a Template
Finally, render the outbound email. The Template node builds text, HTML, or JSON from a body of {{ }} placeholders — no code required.
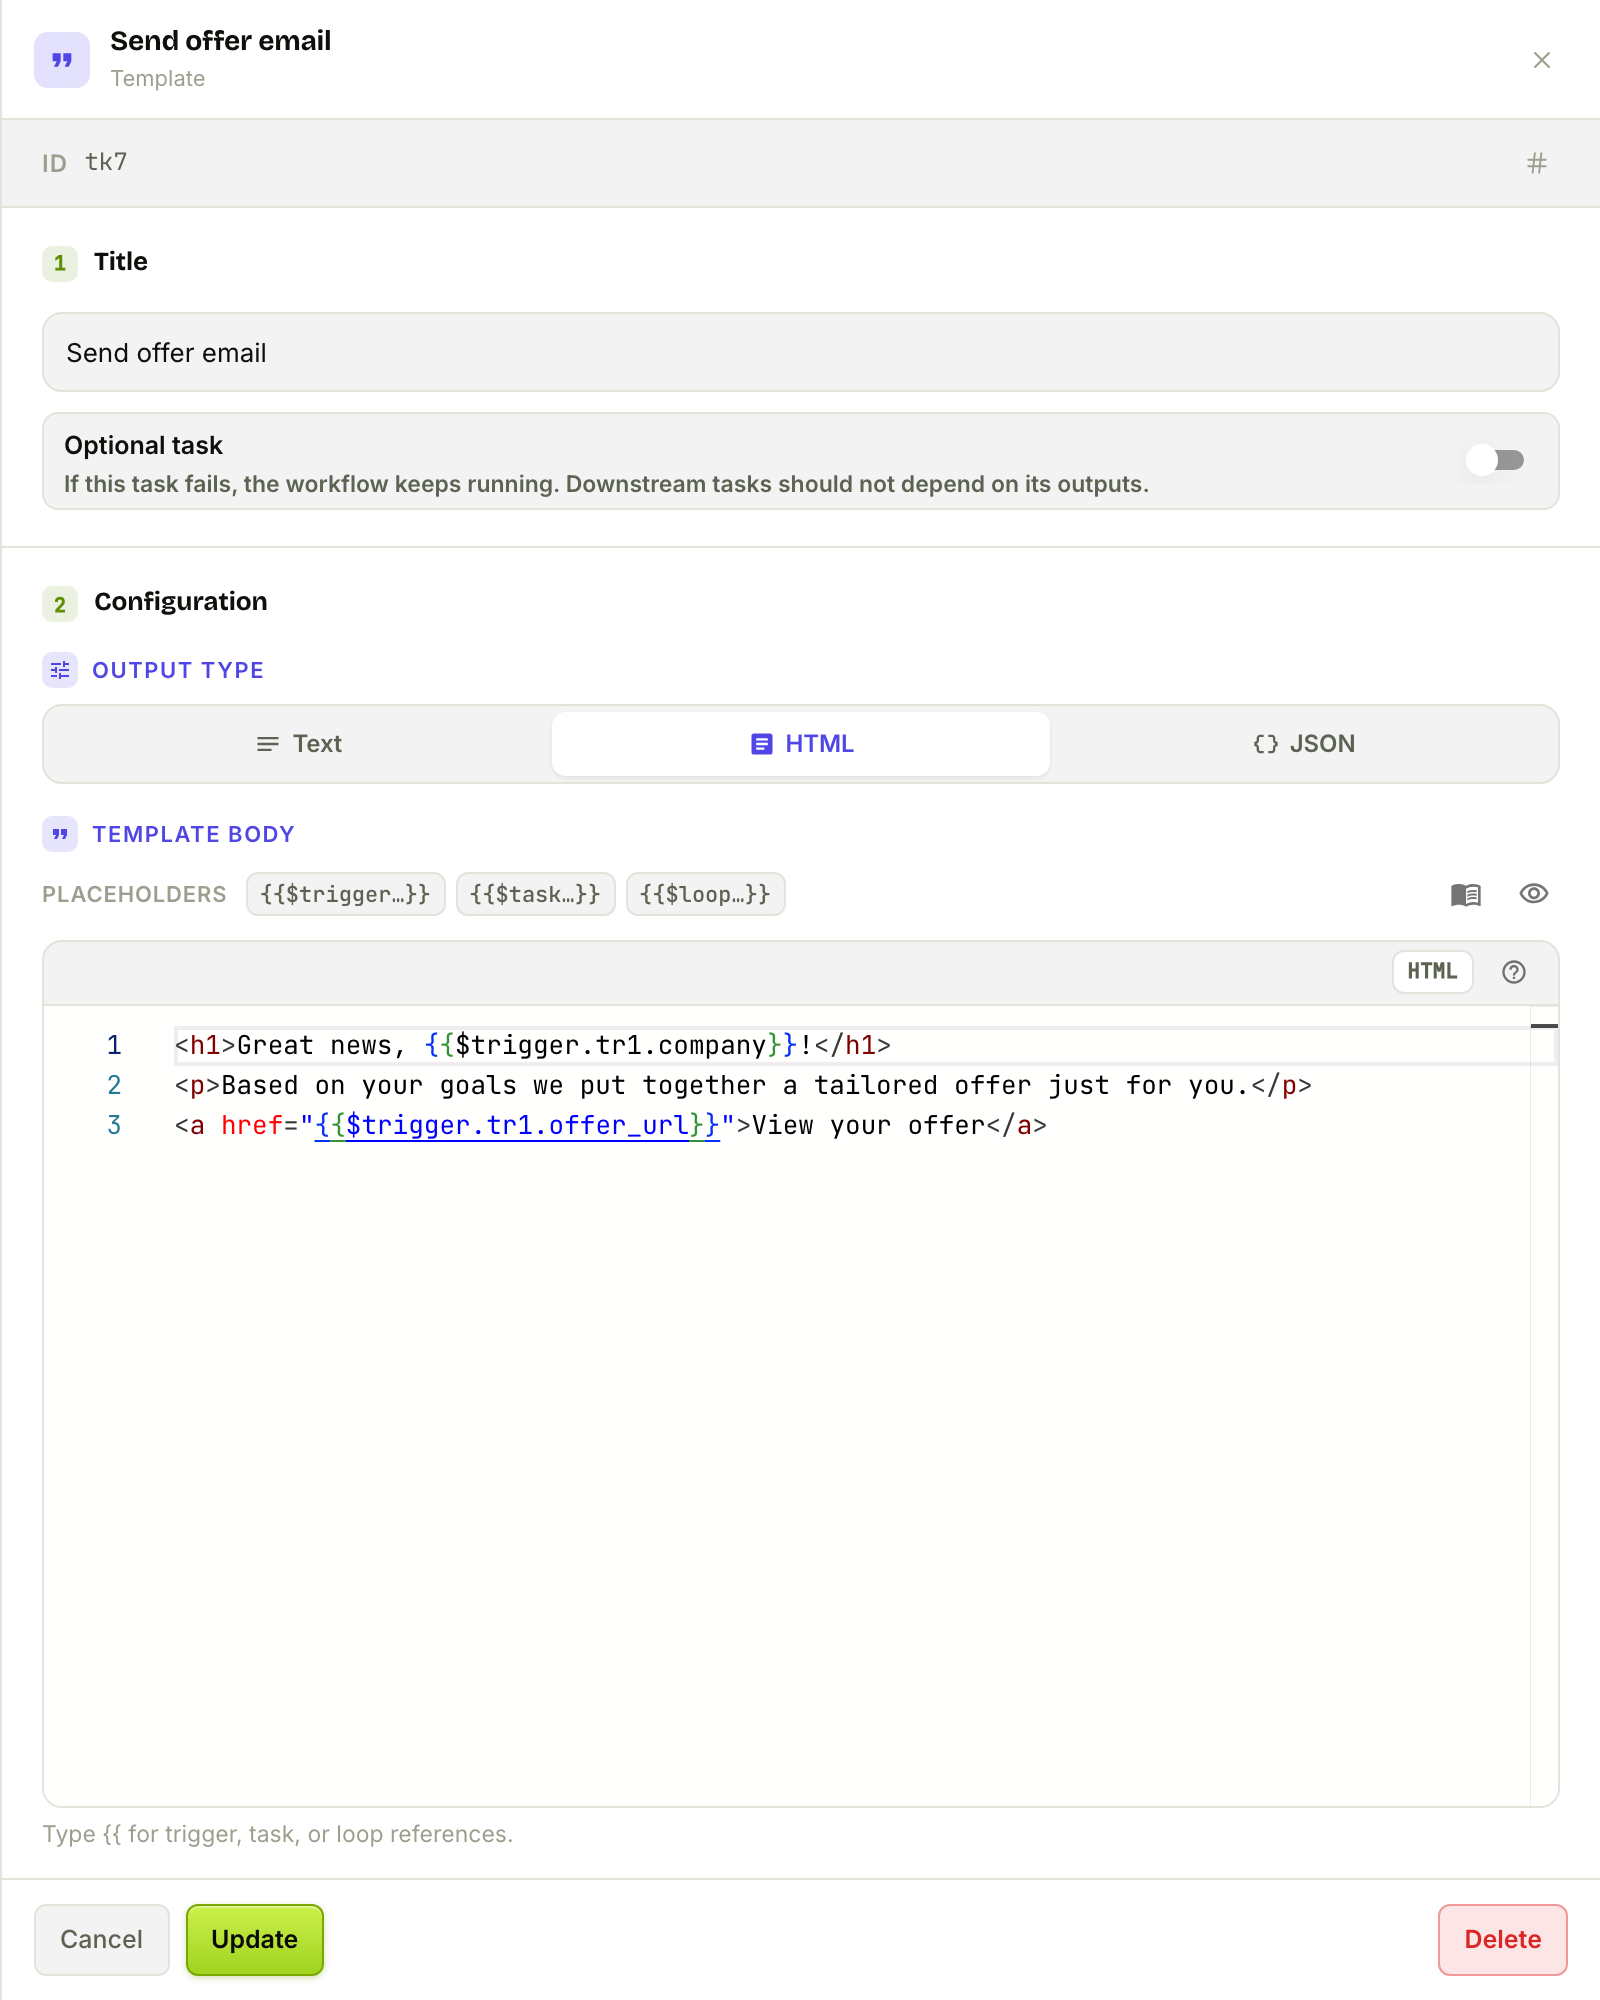
Pick an output type (Text / HTML / JSON) and write the body, pulling in data with {{$trigger.…}} and {{$task.…}} references. Beyond simple substitution, Template supports path‑based blocks — {{ff-if …}}…{{/ff-if}} and {{ff-each item in …}}…{{/ff-each}} — for conditional and repeating sections. The rendered string is exposed downstream as content, ready to feed a Platform Tool that actually sends it.
That's the full hot‑lead path — and the cold path is just a second Template node for the nurture email. Eight node types, one coherent flow.
The rest of the toolbox
Four node types didn't fit our lead flow but are essential for heavier workflows. Here's each one.
Code — your escape hatch
When no pre‑built node expresses the transform you need, the Code node runs a snippet of JavaScript in a locked‑down sandbox and hands its return value on as the task's outputs.
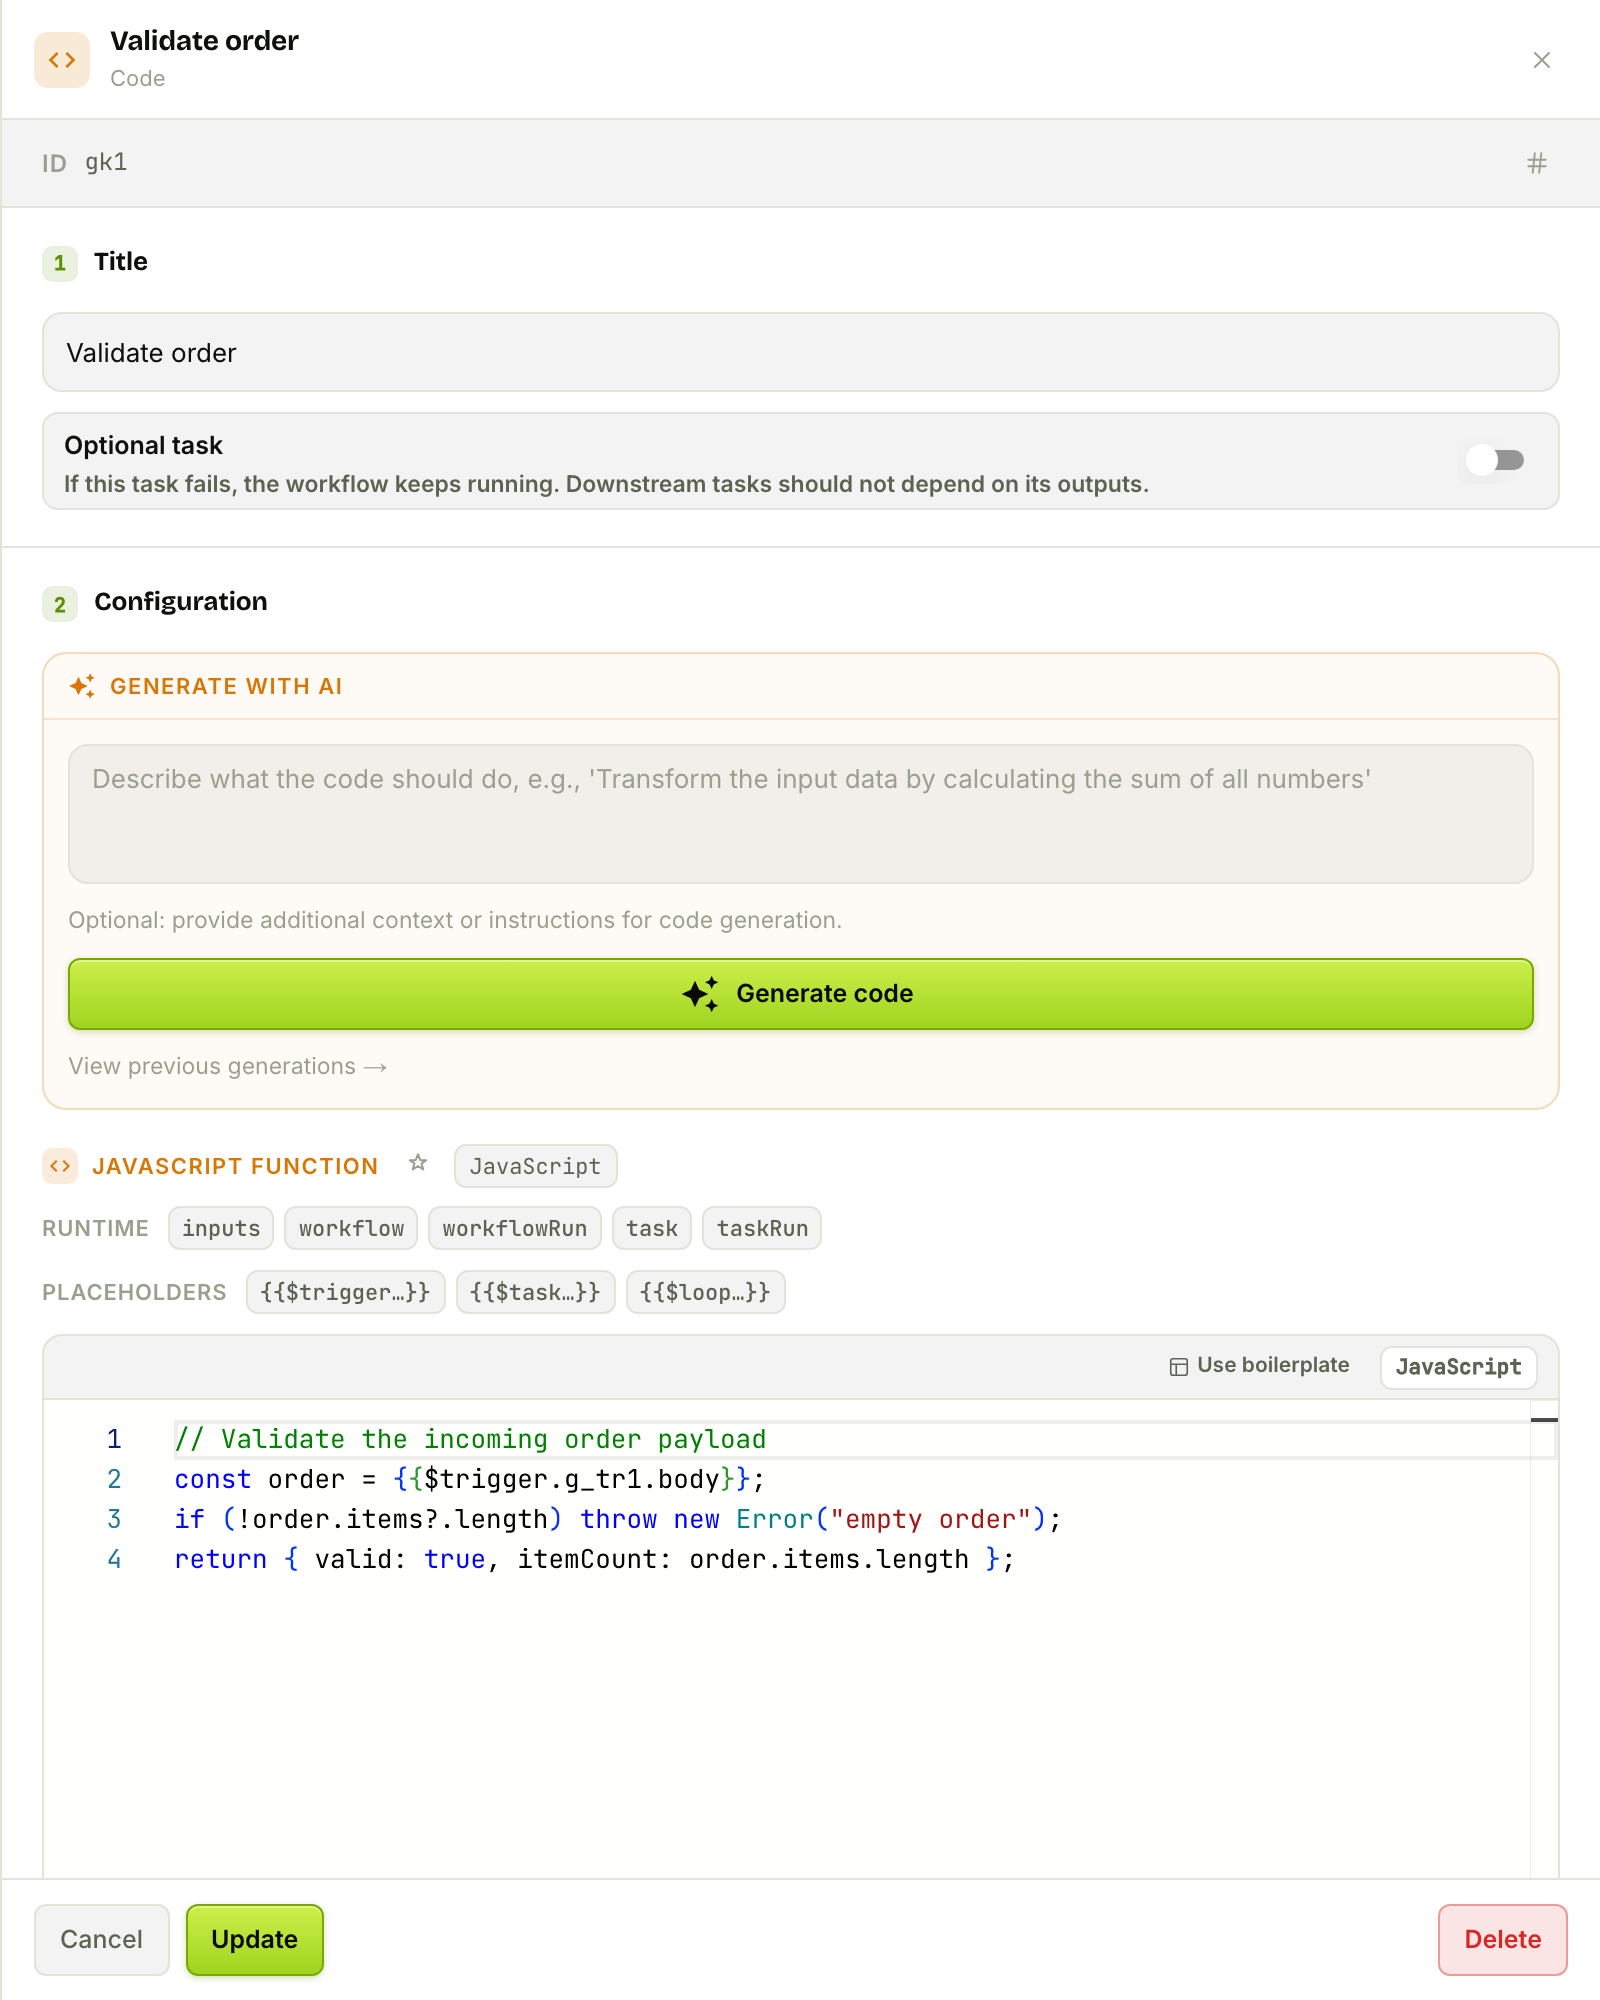
It's a real V8 sandbox (30‑second timeout, 128 MB cap) — not Node.js: no require, fetch, process, or filesystem (use a Platform Tool for HTTP). Any {{ }} placeholders in your code are resolved to real literals before it runs, so you can pull in trigger data, prior outputs, and loop counters type‑safely. Declare your output fields, and whatever you return is validated against them. There's even a Generate with AI panel that writes the JavaScript from a plain‑English description.
Loop — repeat a stretch
The Loop node repeats a segment of your flow a fixed number of times, with an optional pause between passes.
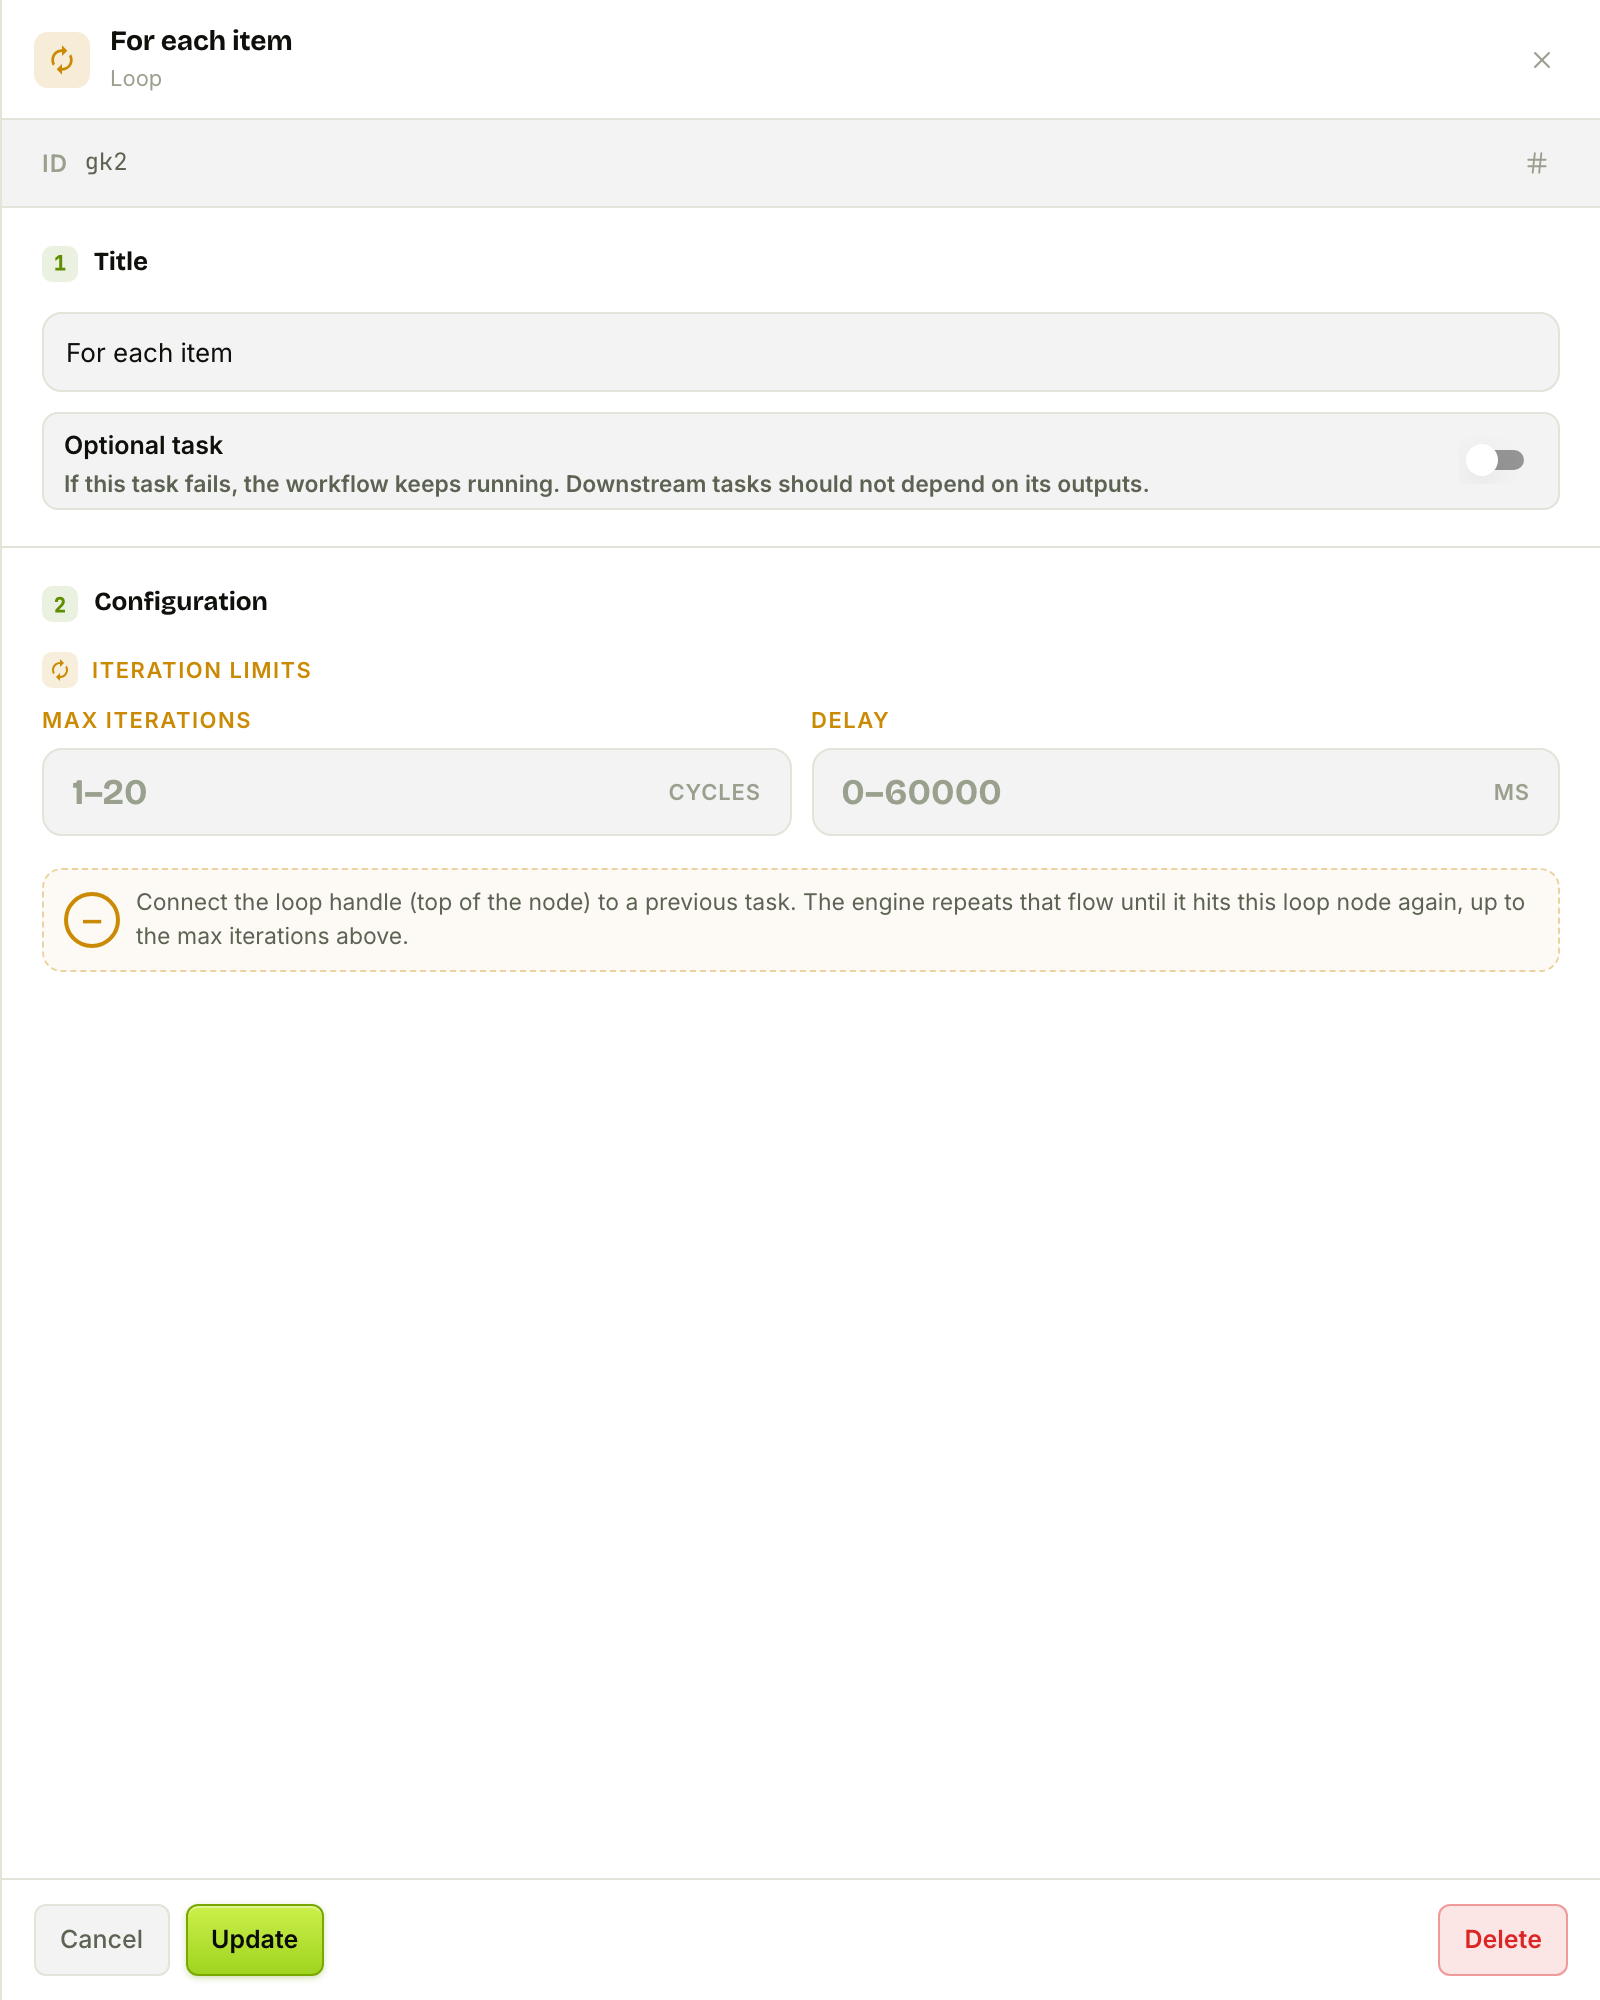
Despite the palette subtitle, it isn't a classic for‑each — there's no array source. It's a fixed‑count repeater (1–20 iterations, plus a 0–60000 ms delay). You place the Loop node at the end of the stretch you want to repeat and drag its top handle back to the first task of that stretch. Body tasks can read {{$loop.iteration}} and {{$loop.max_iterations}} to vary behavior per pass — perfect for rate‑limited retries or paged fetches.
Parallel — fan out and join
The Parallel node fans a single flow into several branch tasks, then waits for all of them before continuing.
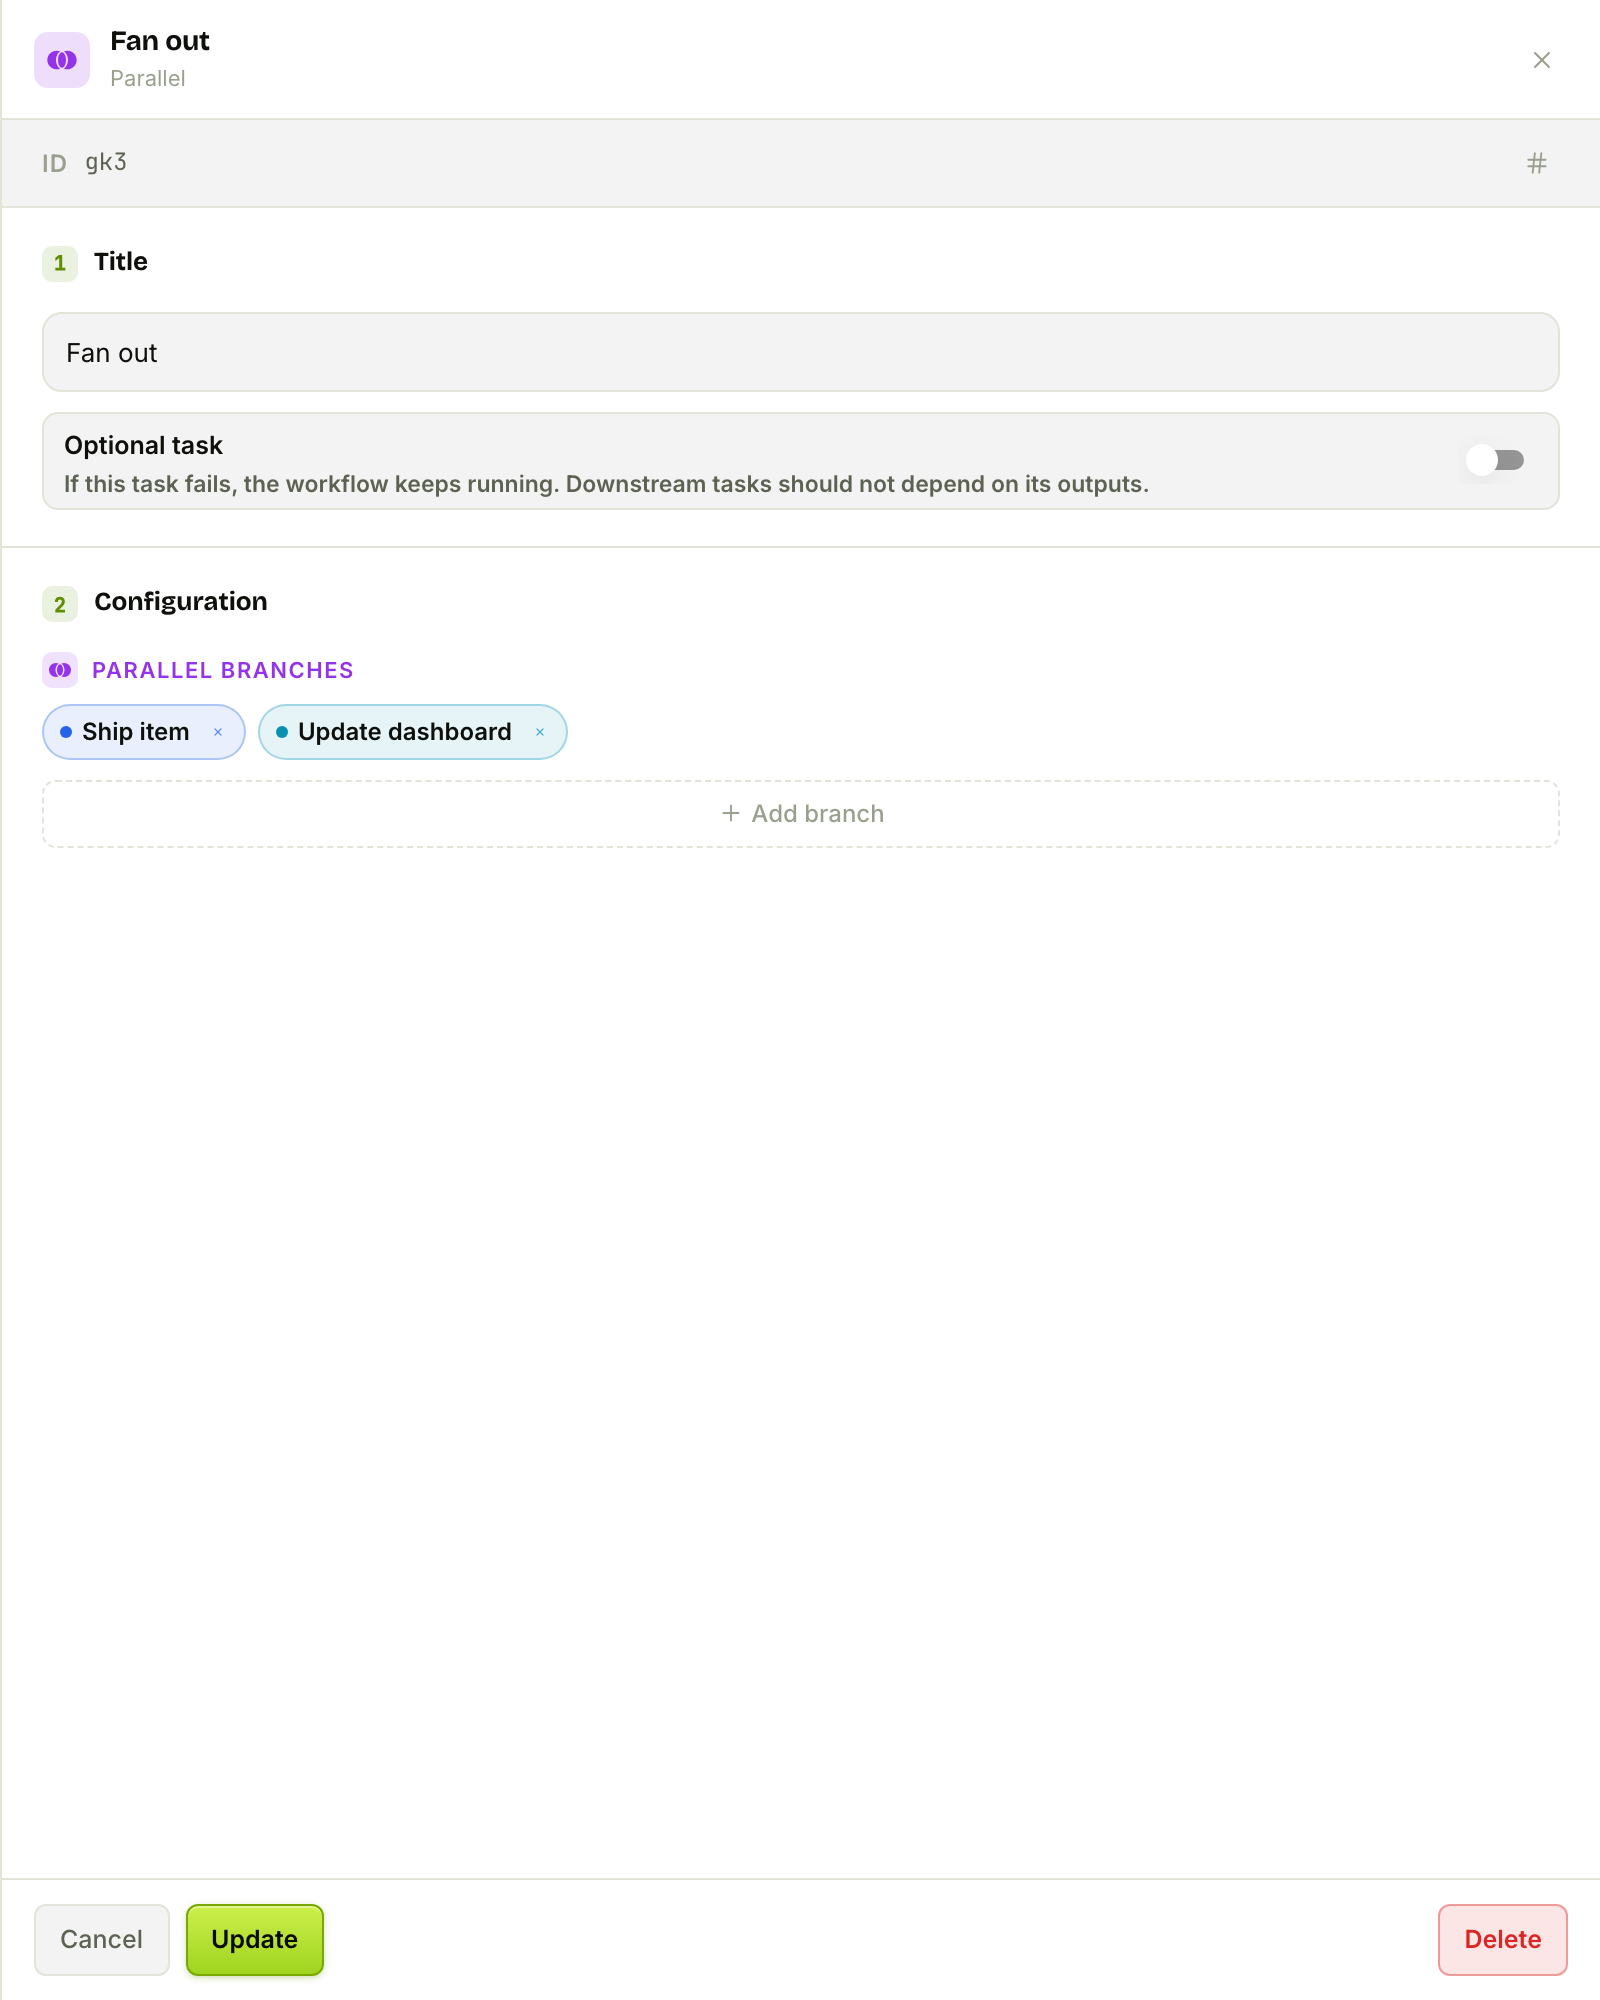
Point it at a set of existing tasks (here Ship item and Update dashboard); when the run hits the node, every branch executes and the node succeeds only once all finish — an implicit "wait‑for‑all" join, after which the flow resumes from the Parallel node's own Next. (Accuracy note: branches run one after another in list order under the hood, so a later branch can read an earlier one's output — but the join always waits for the whole set.)
Data Visualizer — feed a live chart
The Data Visualizer node appends one row per run to an existing Visualizer, so your workflow's results show up as a live chart or table.
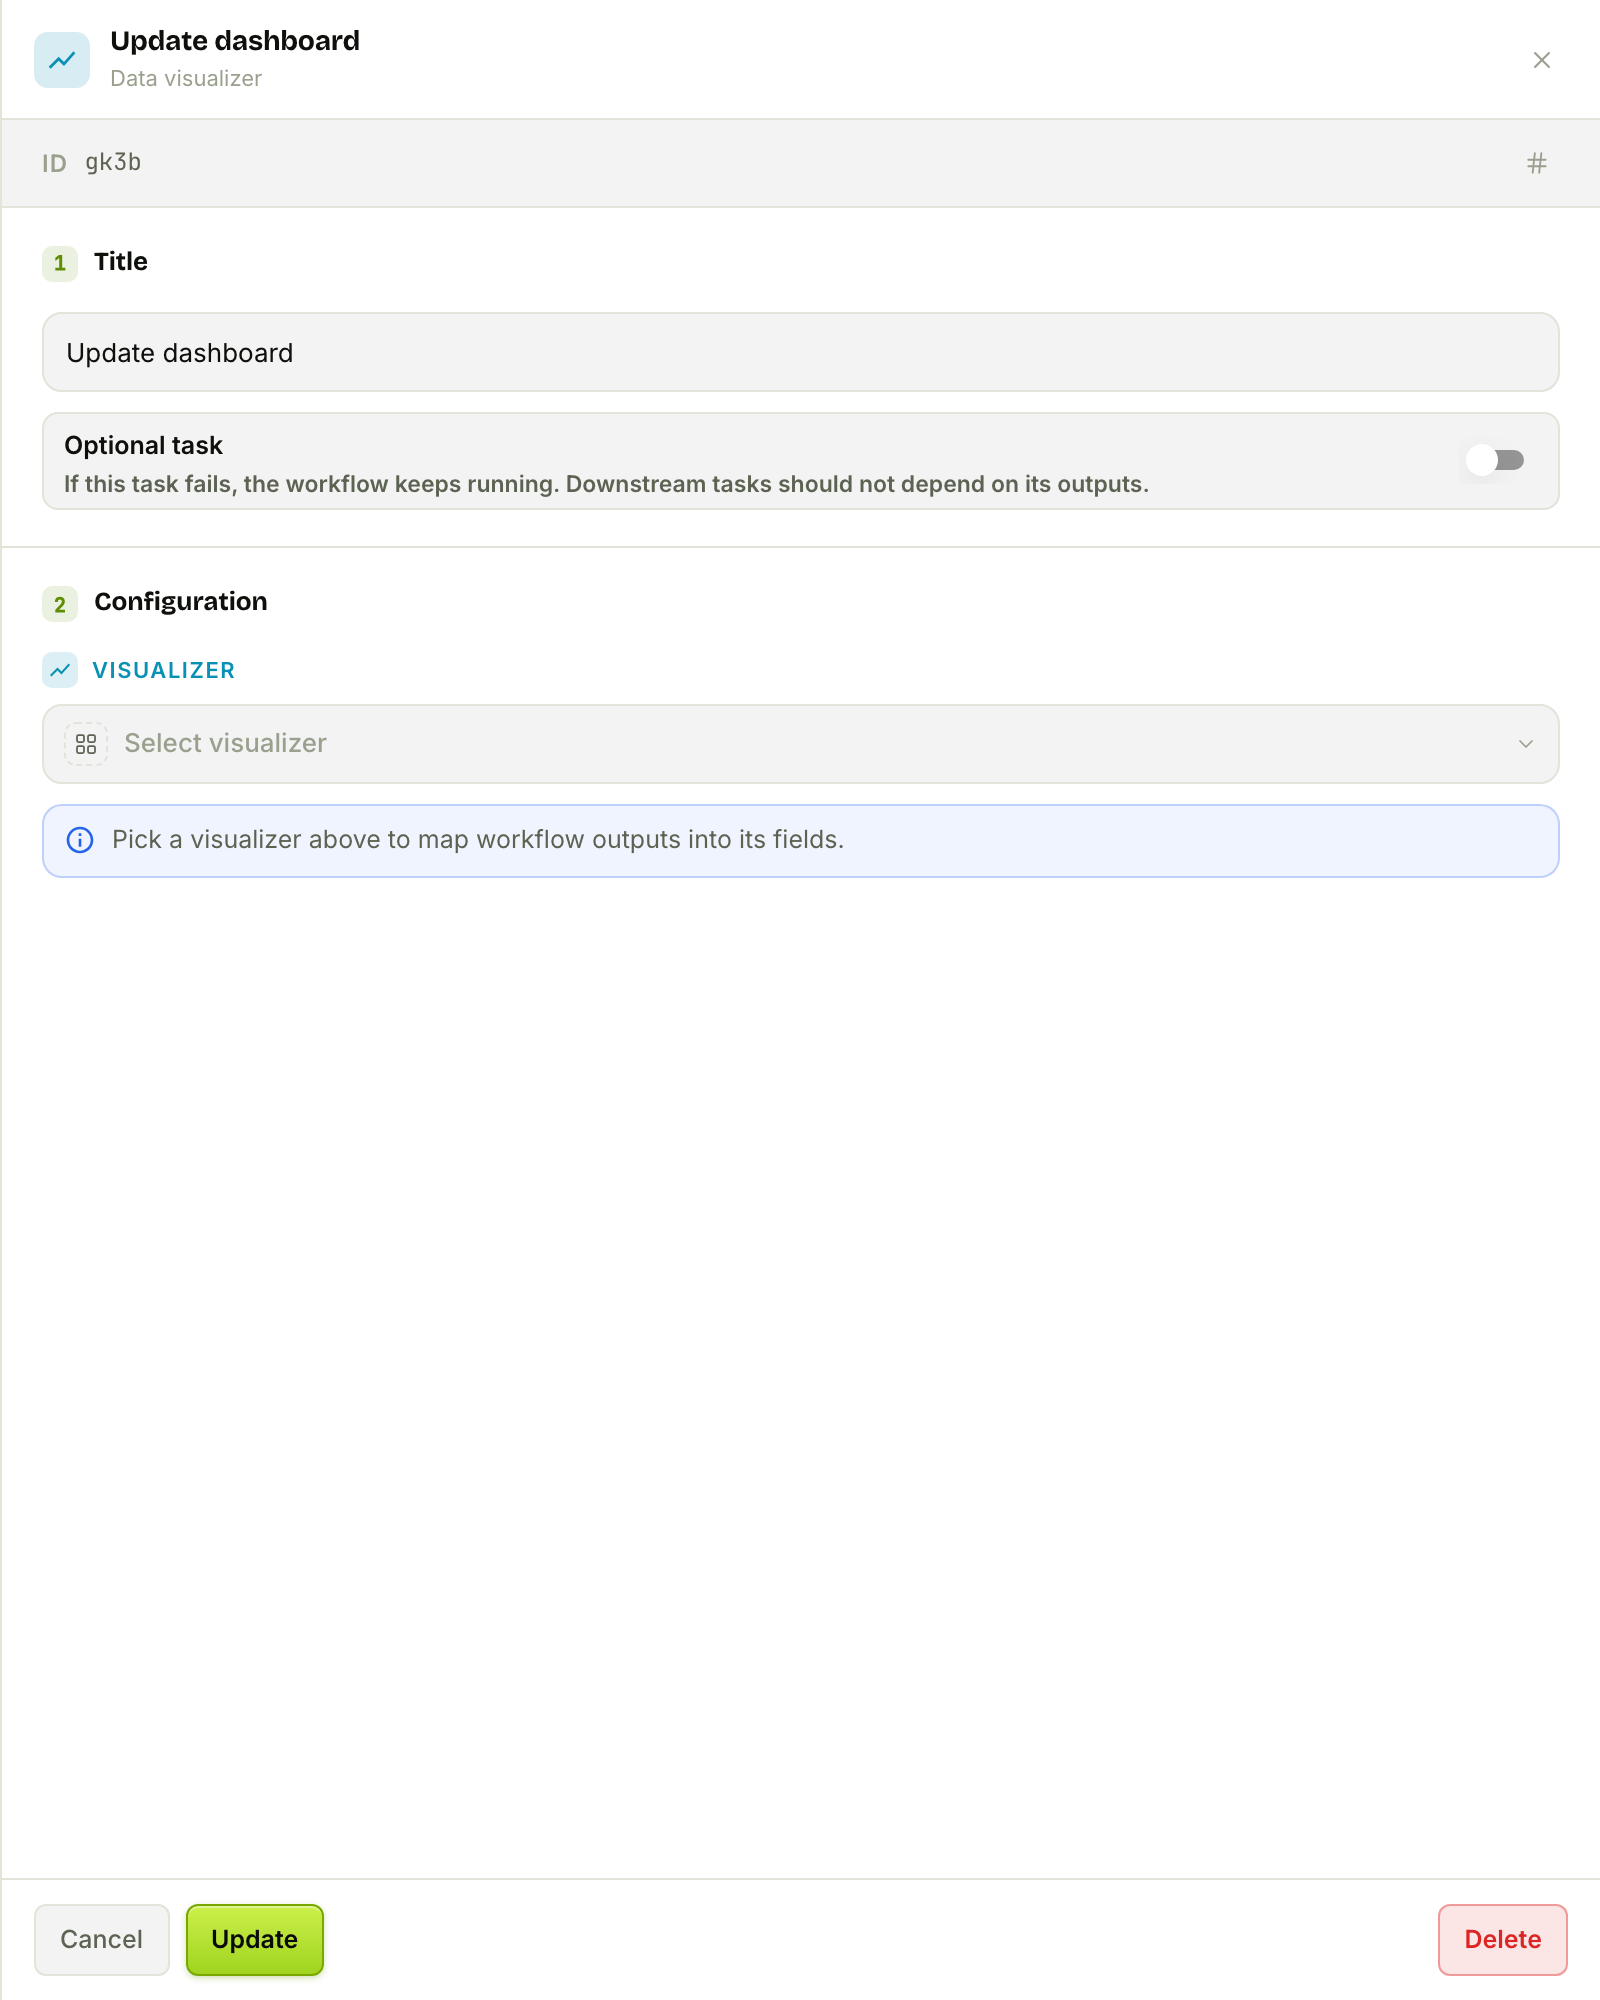
Point it at a pre‑built Visualizer in the same App and map its fields to your task outputs. It's a terminal node — it writes a row and exposes nothing useful downstream — so build the Visualizer (and its columns) first, then let every run drop in a fresh data point.
Test it before you ship
Don't publish blind. Hit Test Run to open the test drawer, choose which trigger to simulate, paste a sample payload, and run the whole flow once end to end.
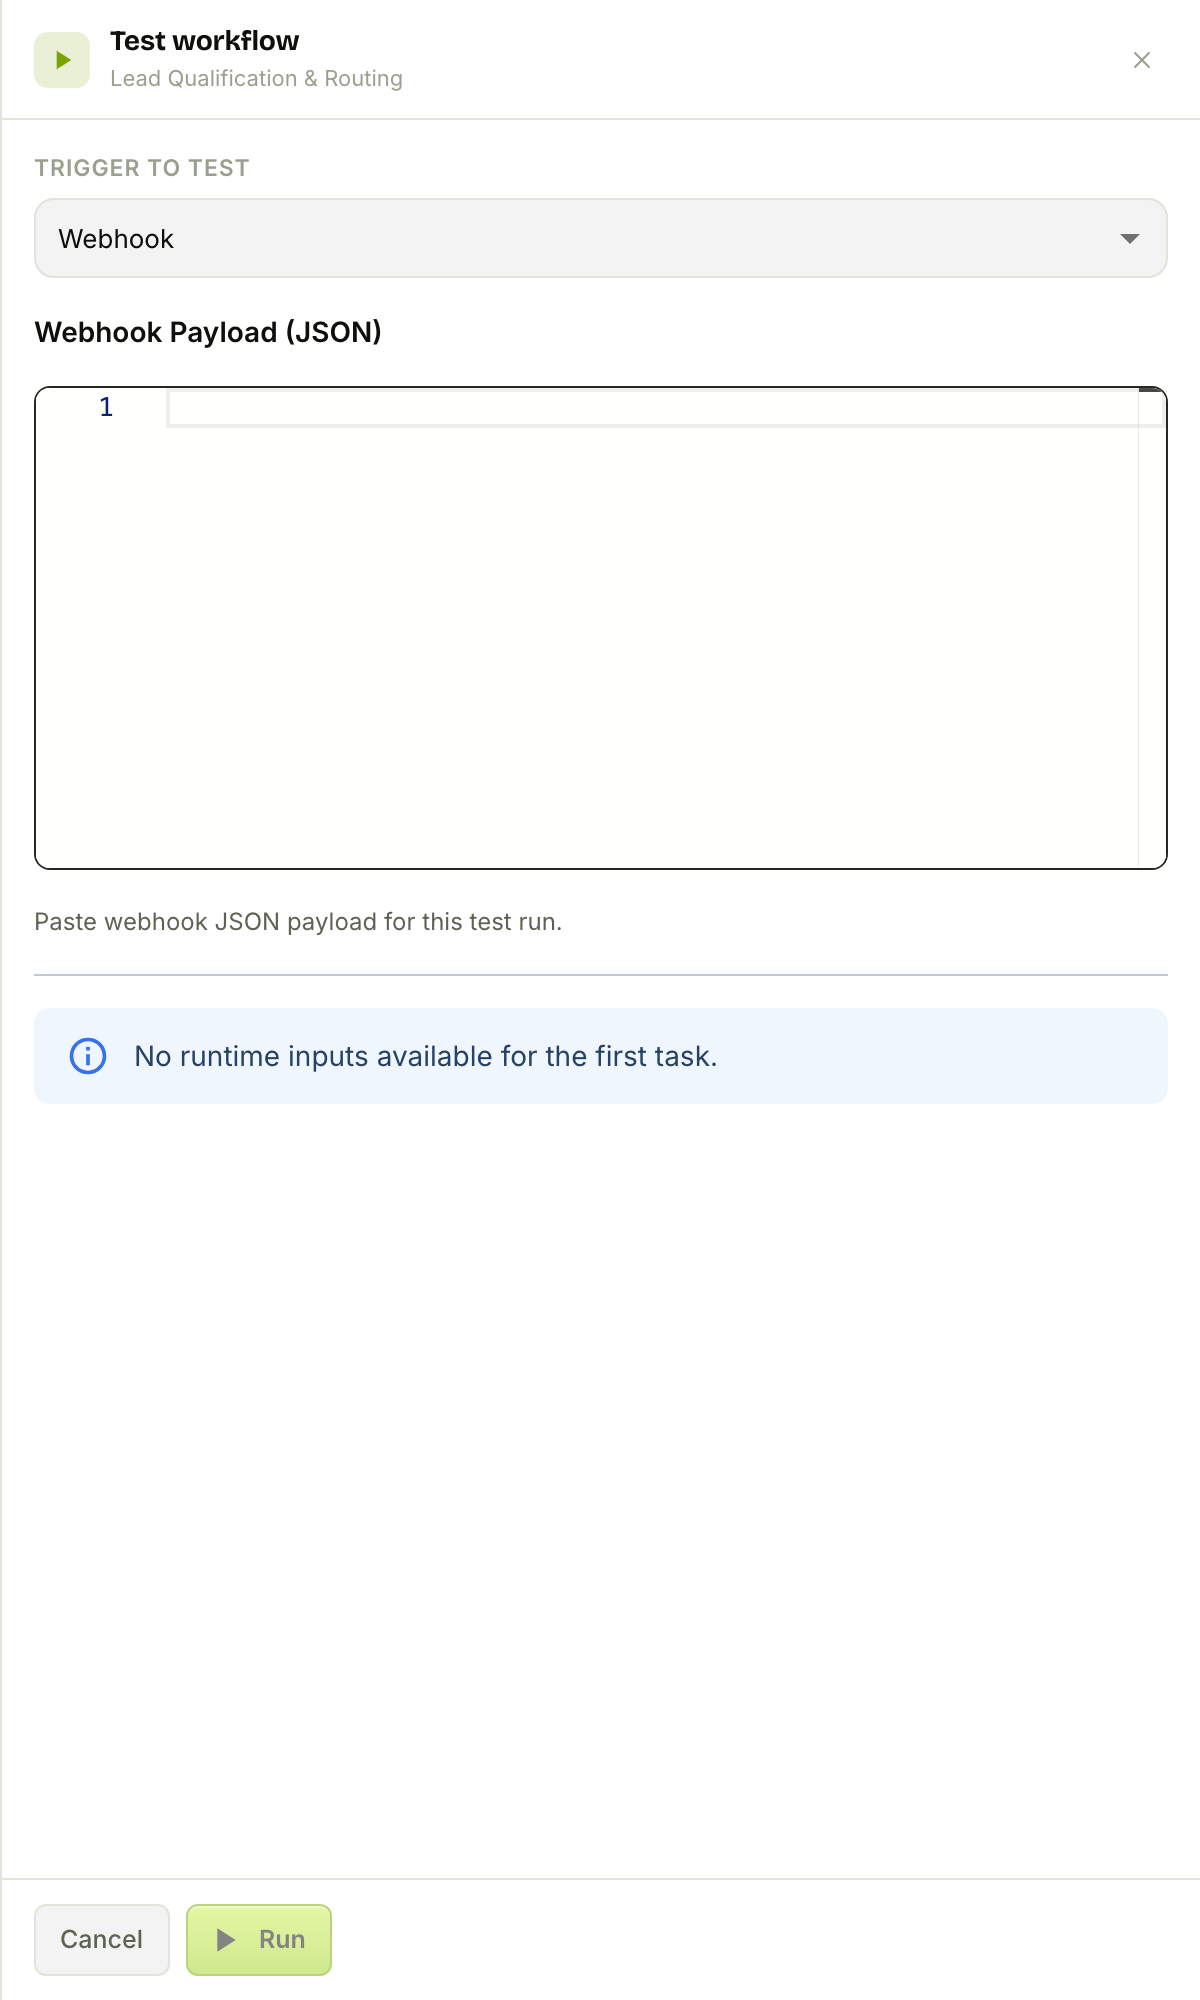
You'll get a full run record — each task's inputs, outputs, and timing — so you can confirm the AI scored correctly, the condition branched the right way, and the approval email would fire, all before a single real lead is touched. When it's green, Save and activate.
The eleven node types at a glance
| Group | Node | What it does |
|---|---|---|
| Trigger | Trigger | Starts the run (webhook / scheduled / API / form / playground / workflow / agent) |
| Action | AI Model | Calls an LLM for text or schema‑validated JSON |
| Platform Tool | Runs one action on an integration (Slack, HubSpot, Gmail…) | |
| Code | Runs your JavaScript in a sandbox | |
| Template | Renders text / HTML / JSON from {{ }} placeholders |
|
| Data Sheet | Reads/writes rows in a FlowFn Data Sheet | |
| Data Visualizer | Appends a row to a Visualizer chart/table | |
| Trigger Inputs | Unifies multiple triggers into one shared input shape | |
| Approval | Pauses for human sign‑off | |
| Logic | Condition | Branches yes/no on an expression |
| Loop | Repeats a segment a fixed number of times | |
| Parallel | Fans out to branches and joins |
Wrap‑up
The pattern that makes FlowFn click: triggers bring data in, action nodes do the work, logic nodes shape the path, and {{ }} references thread the outputs from one node into the next. Our lead‑qualification flow used eight of the eleven node types without a line of glue code — and the remaining three (Code, Loop, Parallel) are there the moment you outgrow the pre‑built ones.
Start small: a trigger, an AI Model, and a Condition already give you an intelligent, branching automation. Then grow it — add a Data Sheet to remember, a Platform Tool to act, an Approval to stay in control. Test Run early and often, and ship when it's green.
Build your first one, and tell us what you automated.